6.2 Create clinical programs & goals
Last updated: September 16, 2026
A step-by-step walkthrough for BCBAs: set up behavior-reduction, skill-acquisition, replacement-behavior, and parent programs, add targets with mastery and maintenance criteria, write technician protocols, and review ABC data — all from a client's Programs tab.
Overview
Alpaca gives BCBAs one clinical workspace to manage every program for a client. From the Programs tab you create programs, add targets with configurable data-collection types and mastery criteria, write the teaching protocols technicians follow, review ABC observations collected in sessions, and graph performance over time. This article covers how to build a program and its goals end to end. For a deeper reference on the individual building blocks — program types, target criteria, the Program Info panel, programming hints, and chaining methods — see the companion article, “Program types, targets & programming options.”
NOTE You need a clinical role with program-editing rights (for example, BCBA) to create and edit programs. The steps below start from a client's record.
1. Open the Programs tab
Step 1. In the left sidebar, click Clients, then open the client you want to work on. You can type a name in the “Search by name or location” field to find them quickly.
Step 2. On the client's record, click the Programs tab in the row of tabs near the top. The tabs run Overview, Session Notes, Recurring Appointments, Programs, Data Visualization, and so on. (Don't confuse the Programs tab with the separate “Programming Hints” tab at the end of that same row — see the companion article.)
The Programs tab for a client. Programs are grouped into the Behavior, Skills, Parent, and ABC sub-tabs; the green Actions button (top-left of the list) is where you create programs.
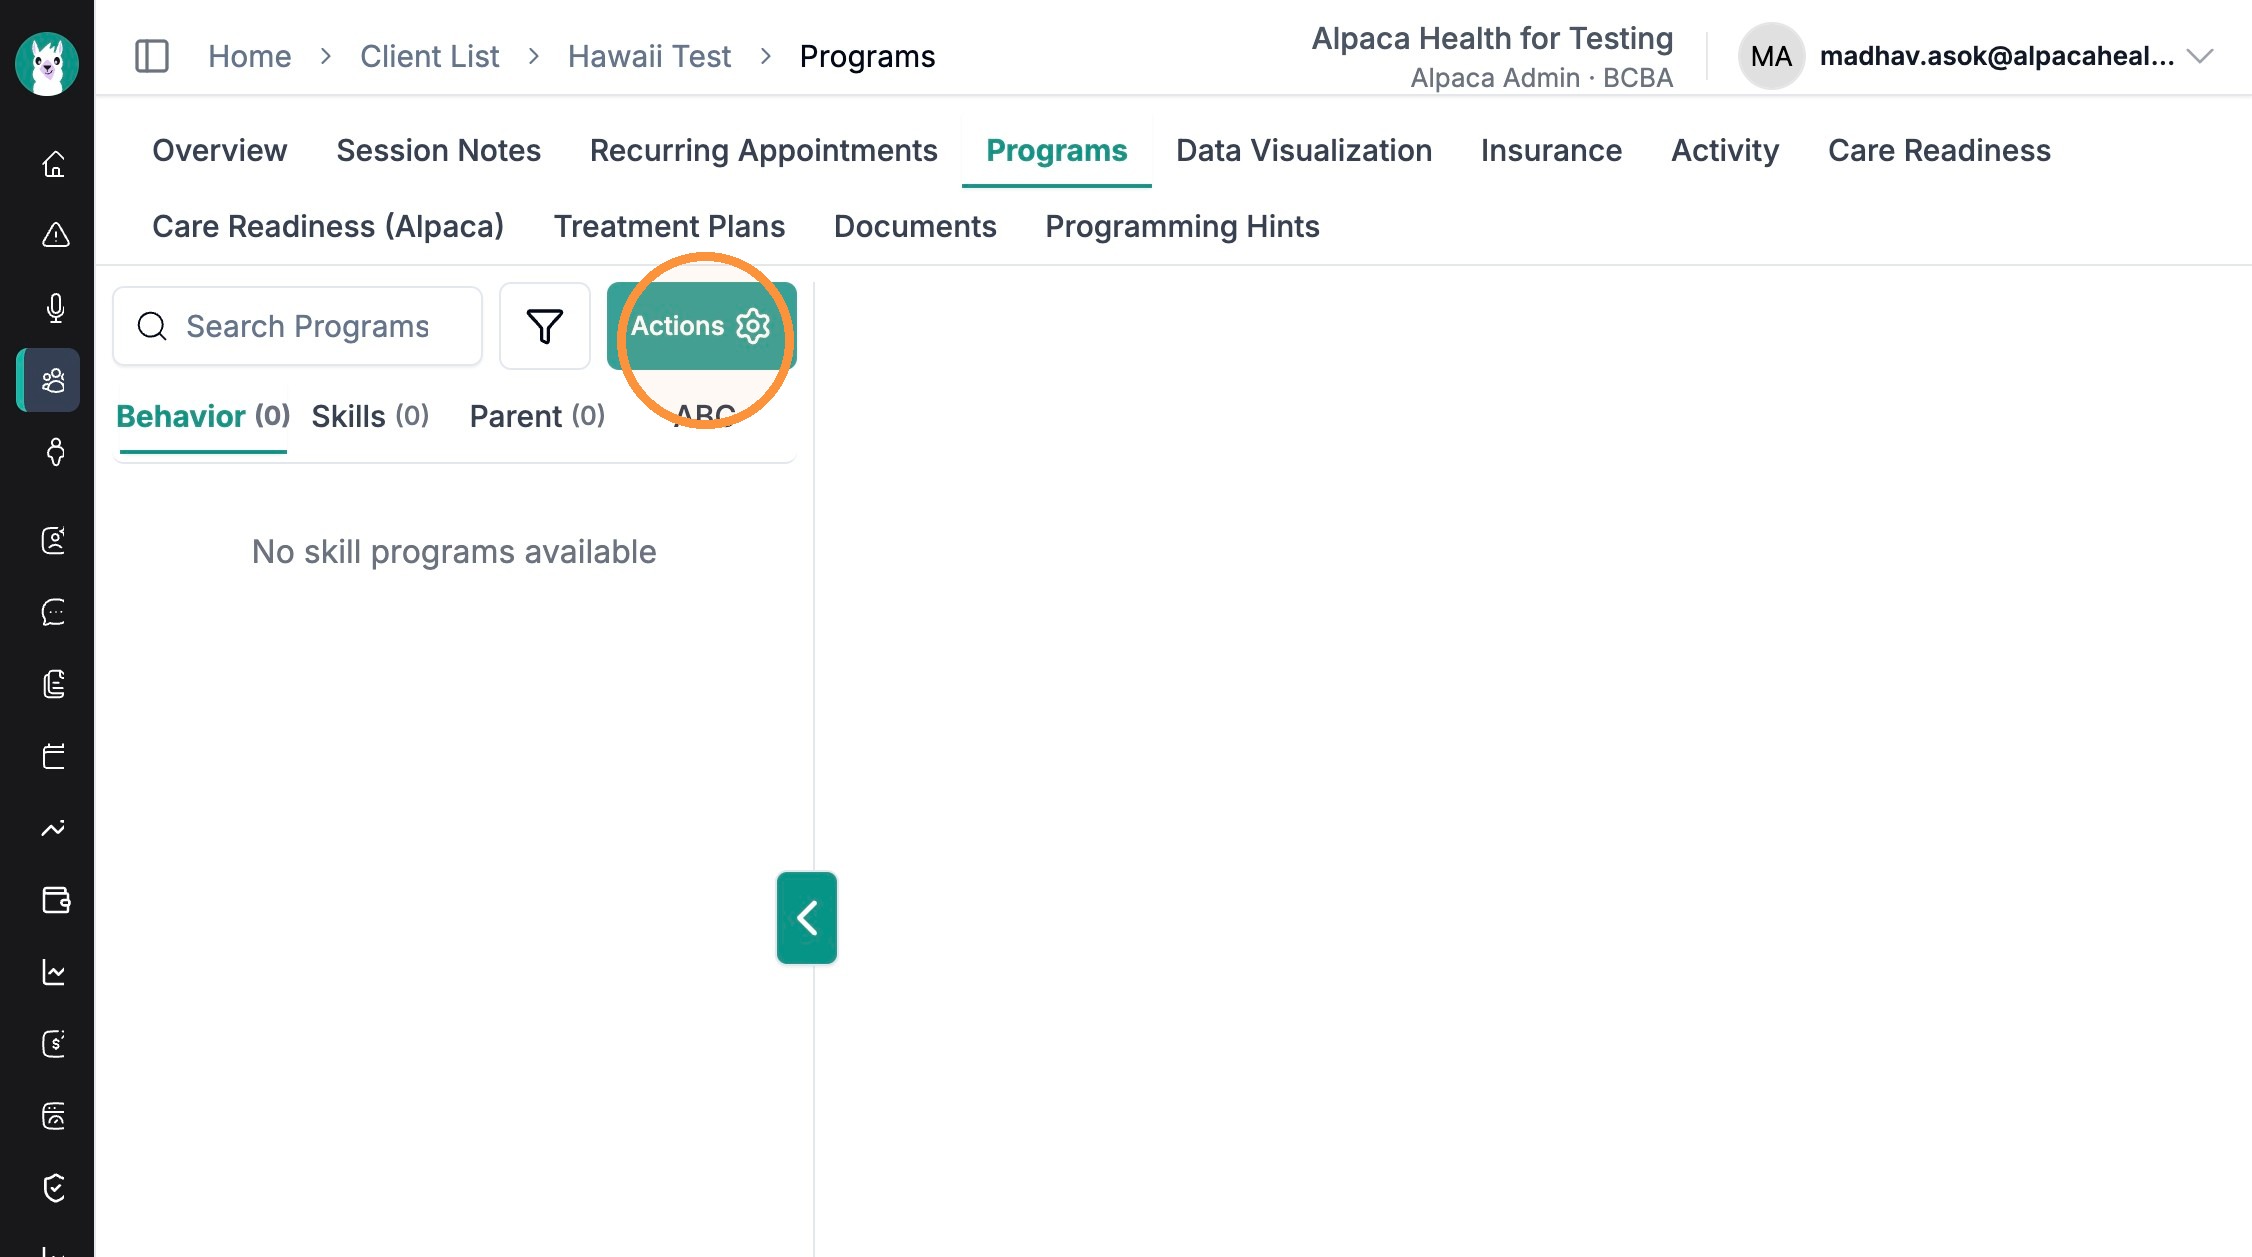
The four sub-tabs group your programs:
Behavior — behavior-reduction programs.
Skills — skill-acquisition and replacement-behavior programs.
Parent — parent-training programs.
ABC — Antecedent-Behavior-Consequence observations.
2. Create a new program
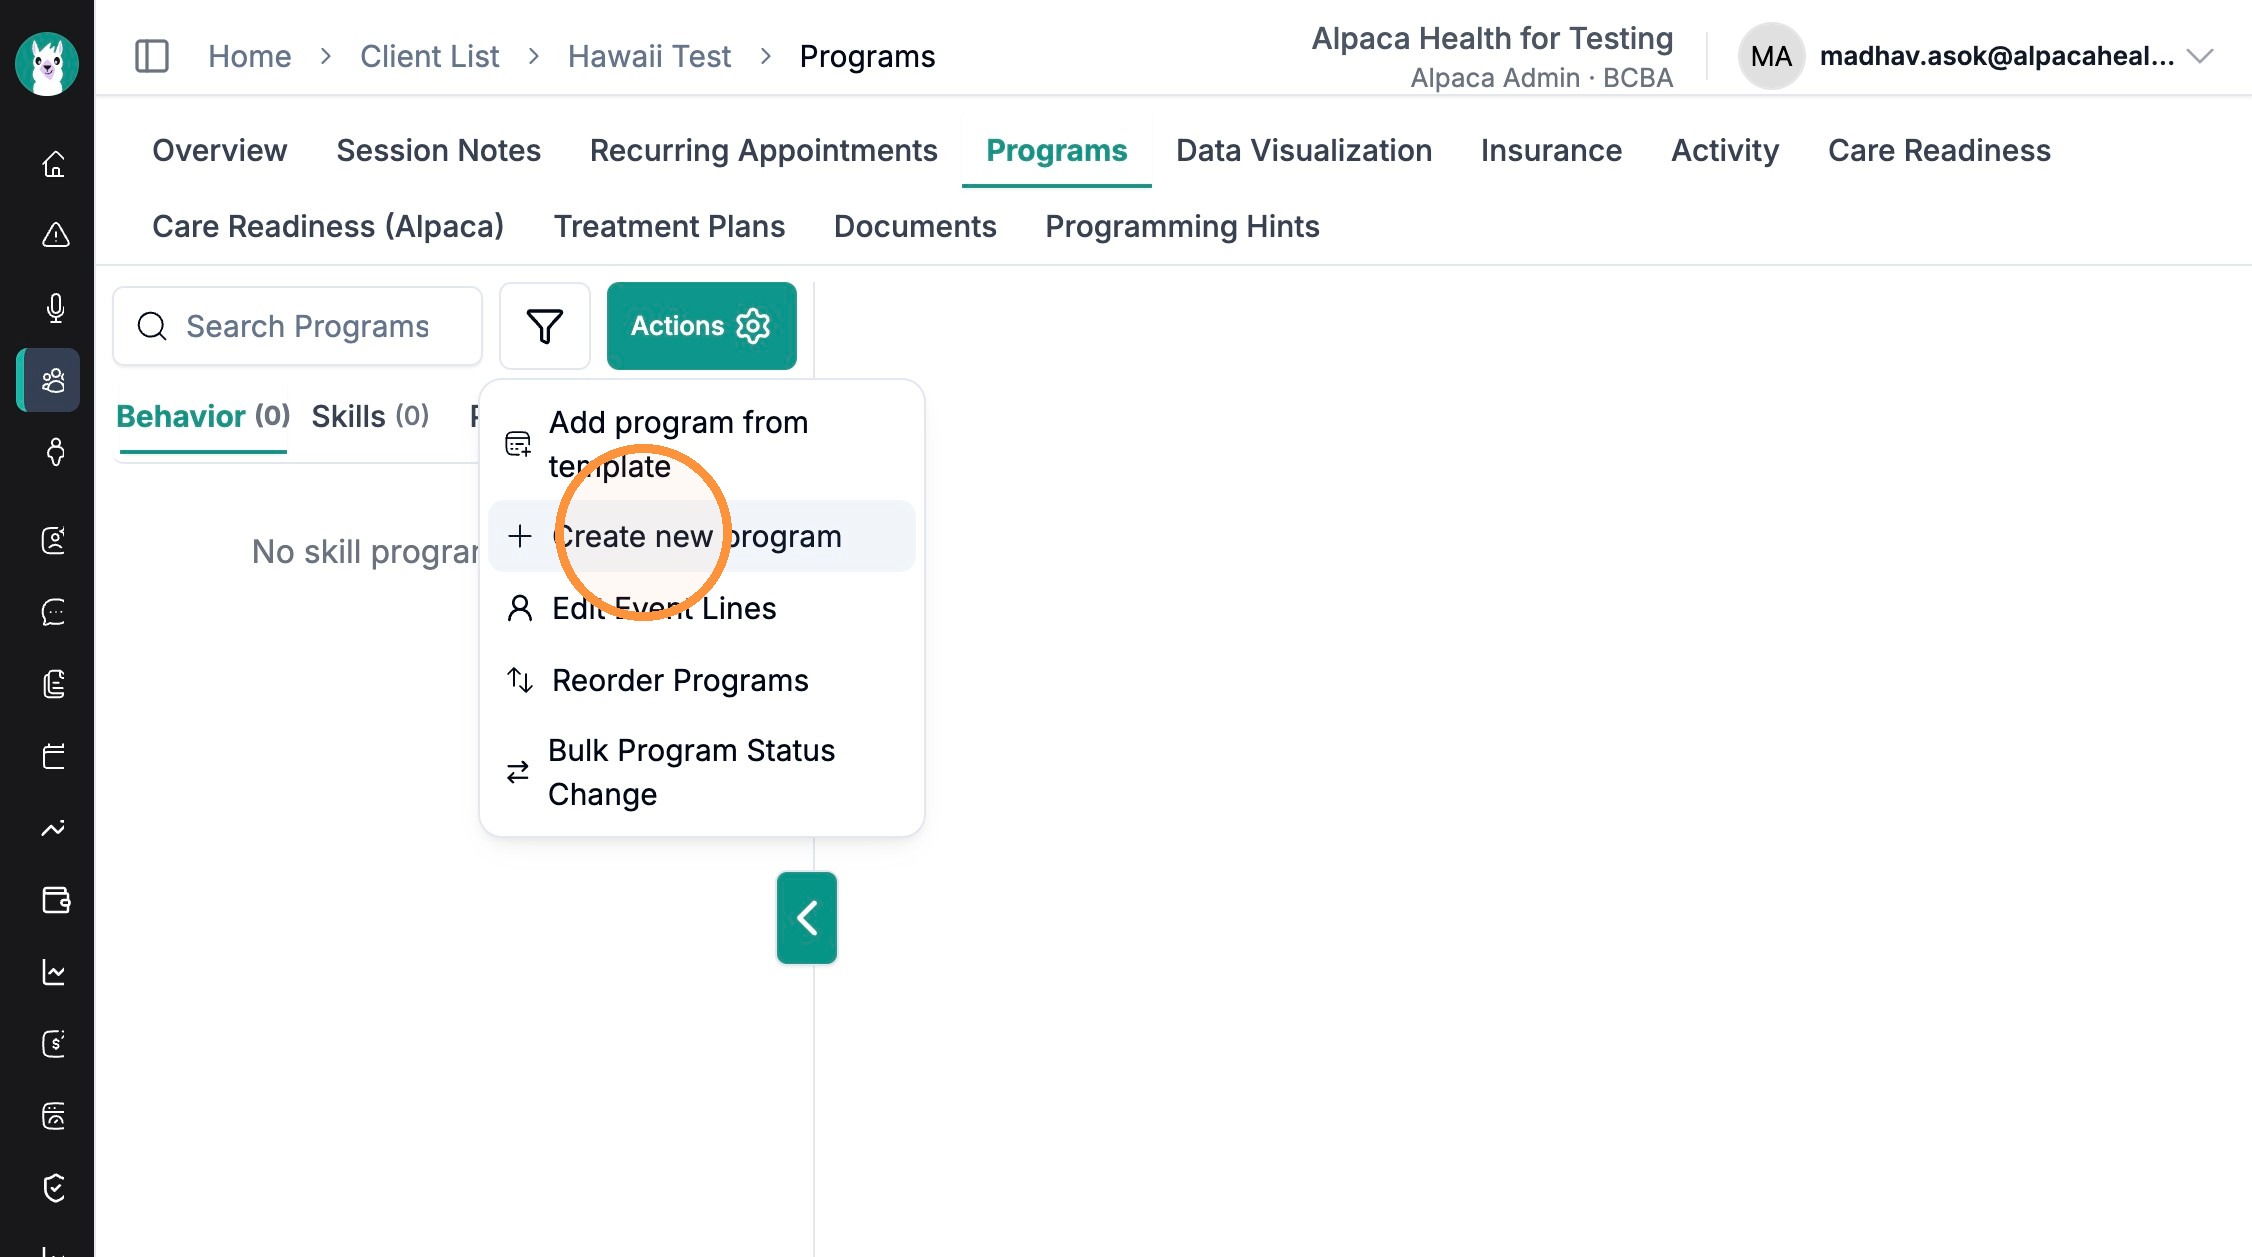
Step 1. Click Actions (the green button, top-left of the program list), then choose Create new program. The Actions menu also holds “Add program from template,” “Edit Event Lines,” “Reorder Programs,” and “Bulk Program Status Change.”
Actions menu → “Create new program.”
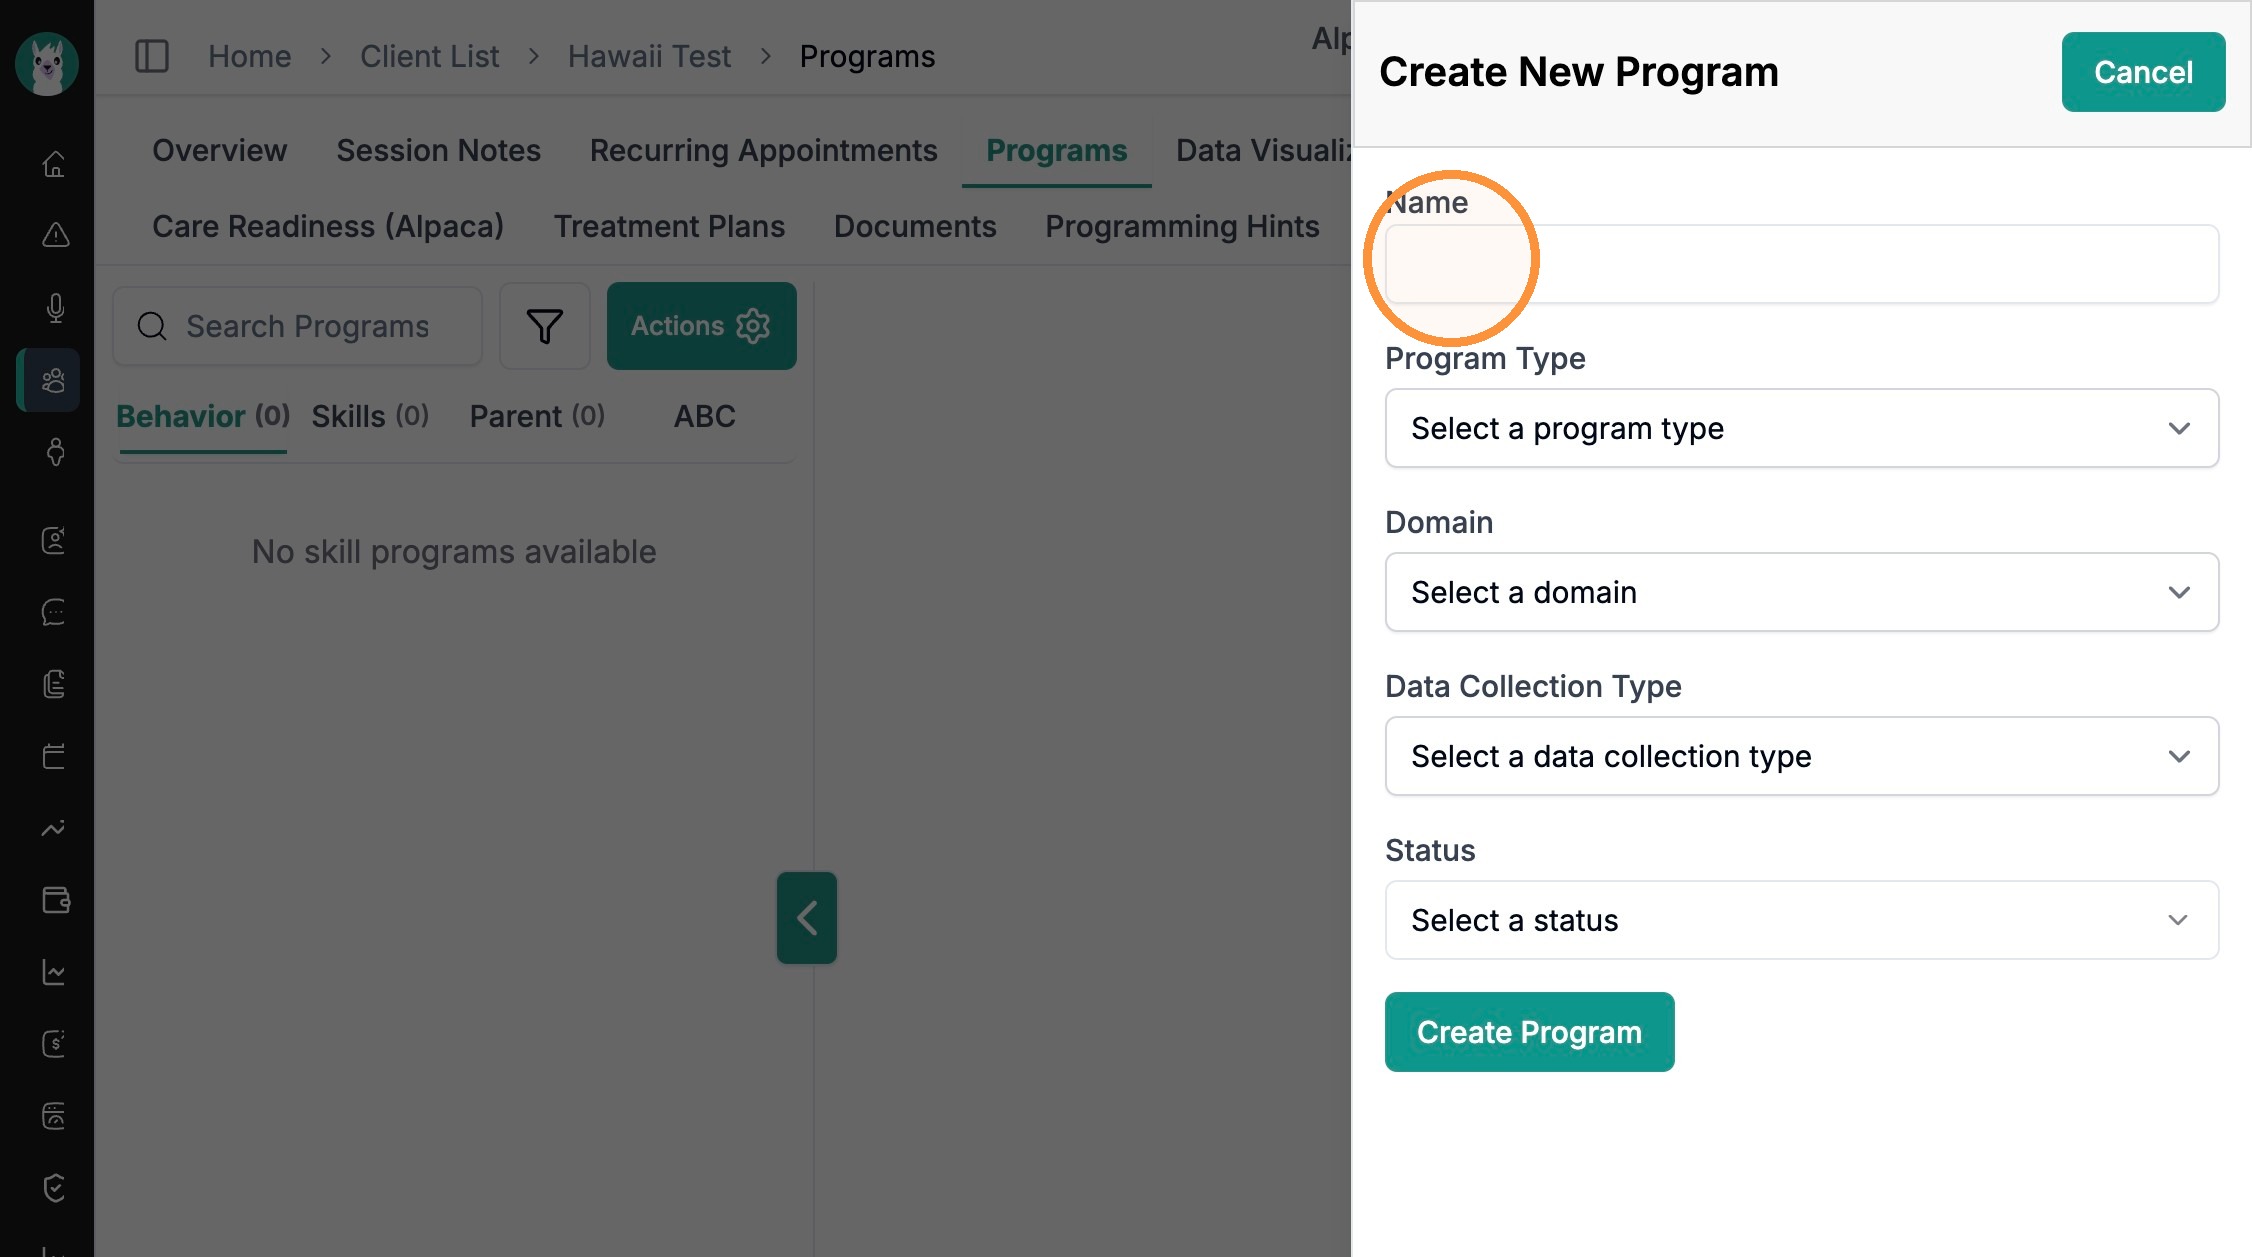
Step 2. Fill in the Create New Program panel that slides in from the right. Complete these fields from top to bottom:
Name — a clear program name (for example, “Requesting items”).
Program Type — Skill Acquisition, Behavior Reduction, or Replacement Behavior. This determines which sub-tab the program lands under.
Domain — the skill/behavior area (for example, Expressive Communication, Visual Perception, Adaptive Skills).
Data Collection Type — how data is recorded (Duration Based, Frequency Based, Trials with/without Prompting, Task Analysis with/without Prompting, Intervals, or Likert Scale). Some choices reveal extra settings — see Step 5.
Measurement type can be set at both program and target level.
Status — start with Active Baseline for a new program.
The Create New Program panel: Name, Program Type, Domain, Data Collection Type, and Status. Click Create Program at the bottom when the fields are set.
Step 3. Choose a Status, then click Create Program. The Status list is grouped: Active Baseline, Active, Generalization, and Maintenance appear during data collection; everything below the divider (Mastered, Draft, Future, On Hold, Discontinued) is hidden from technicians during sessions.
Status options. Statuses below the green divider line do not appear in data collection.

3. Set data-collection settings (when they appear)
Some data-collection types add extra fields to the create form before you save:
Prompting types (Trials with Prompting, Task Analysis with Prompting) reveal a Prompt Hierarchy list you can reorder or trim (Independent, Gestural, Visual, Model, Partial/Full Physical, Partial/Full Verbal, No Response, Error).
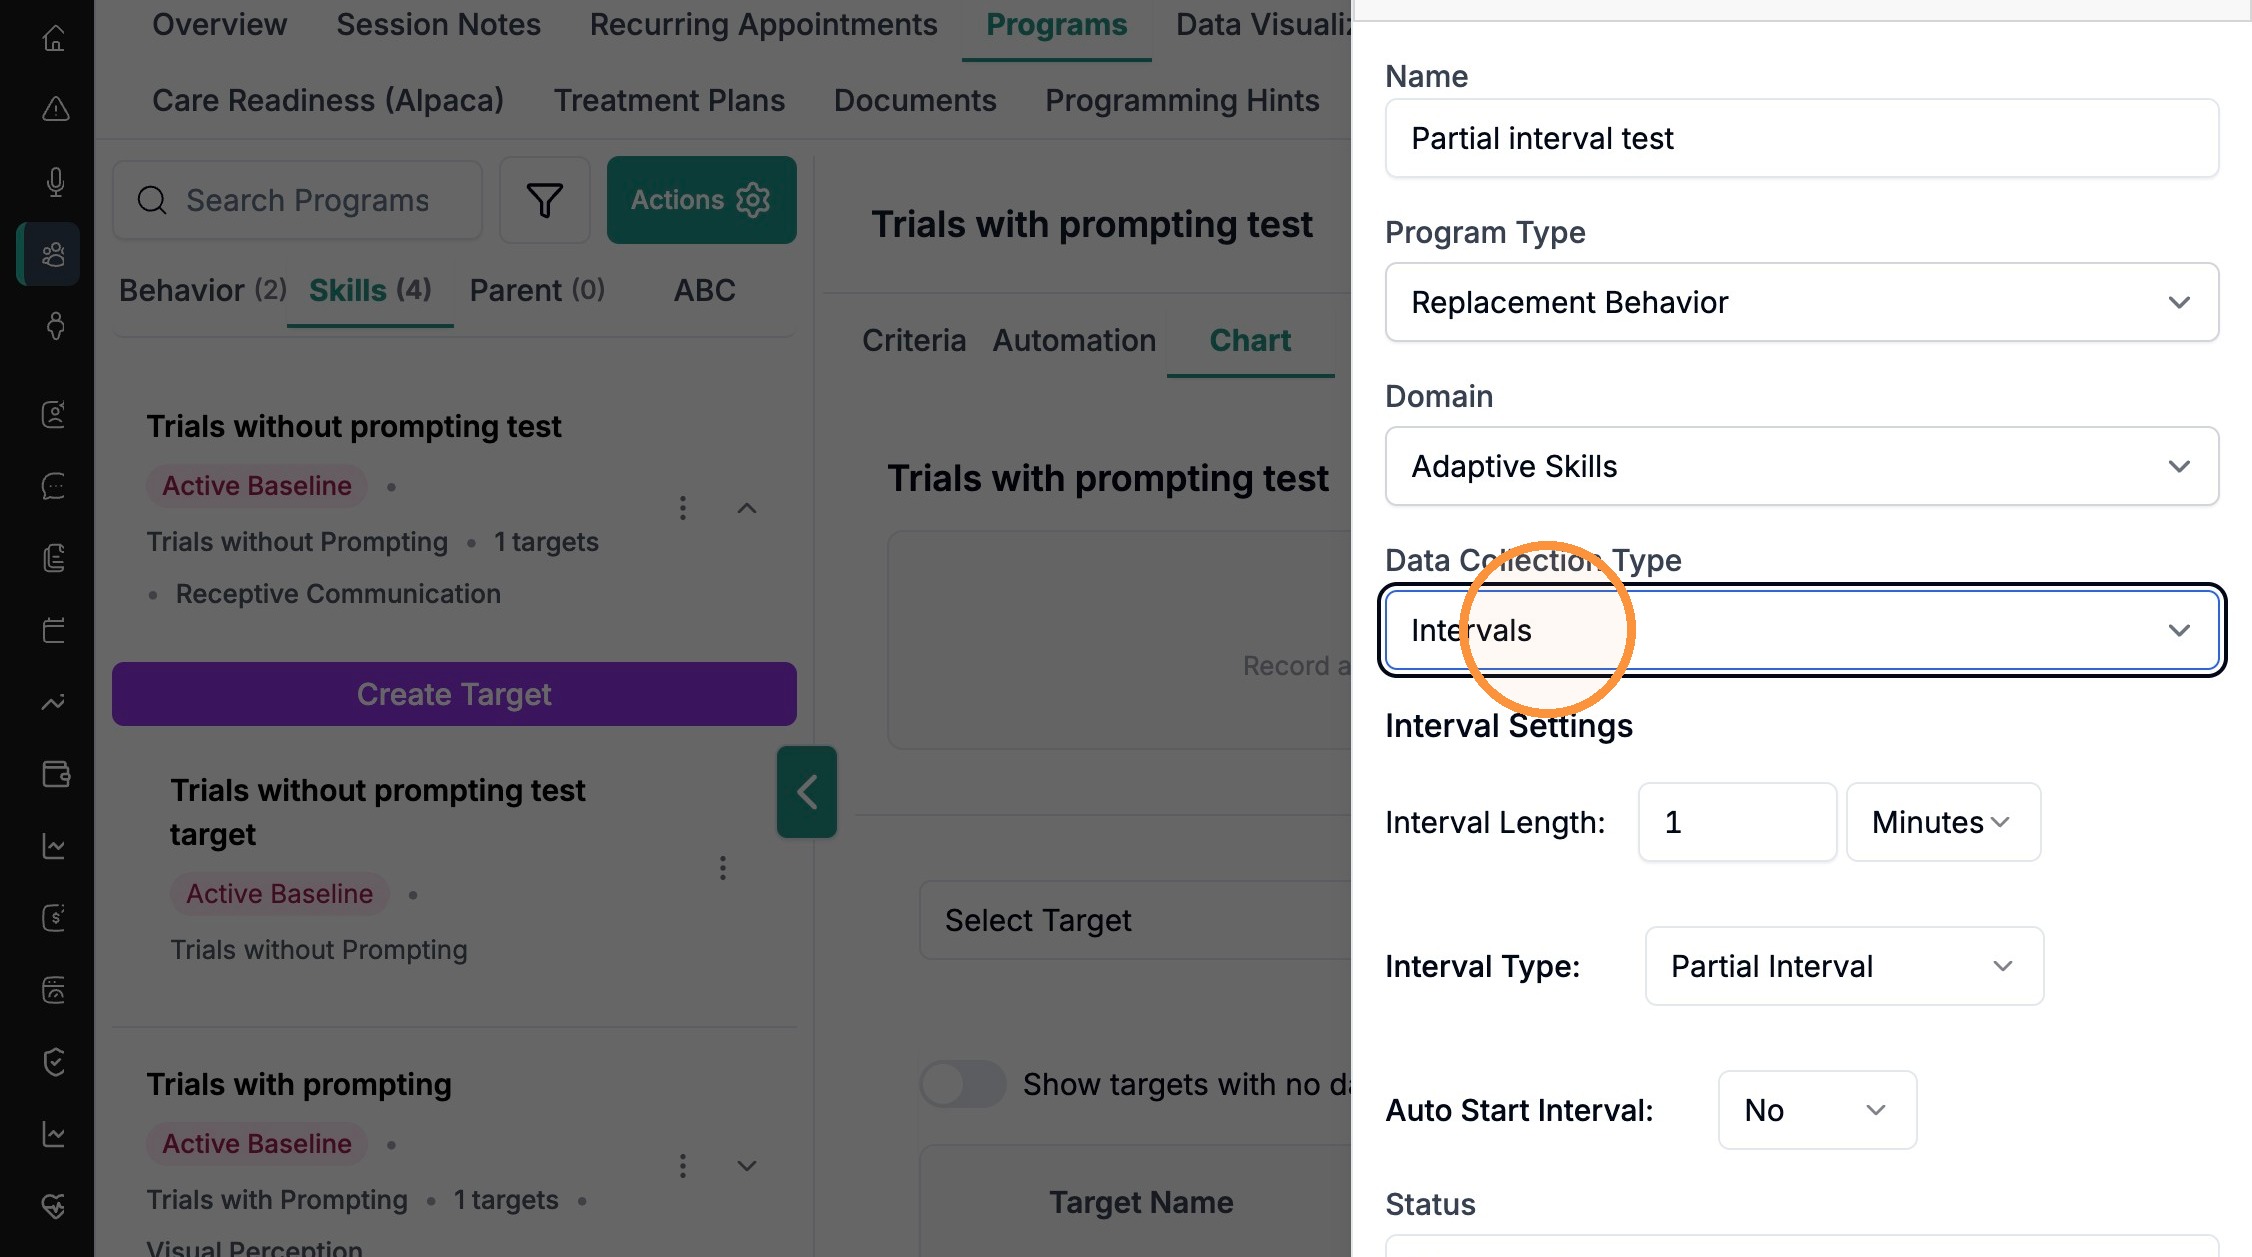
Intervals reveals Interval Settings: Interval Length, Interval Type (Partial Interval or Whole Interval), and Auto Start Interval (Yes/No).
Example: choosing “Intervals” adds Interval Length, Interval Type, and Auto Start Interval settings.
4. Add a target and set mastery & maintenance criteria
As soon as a program is created, the Create Target panel opens so you can add its first goal. A program can hold several targets.
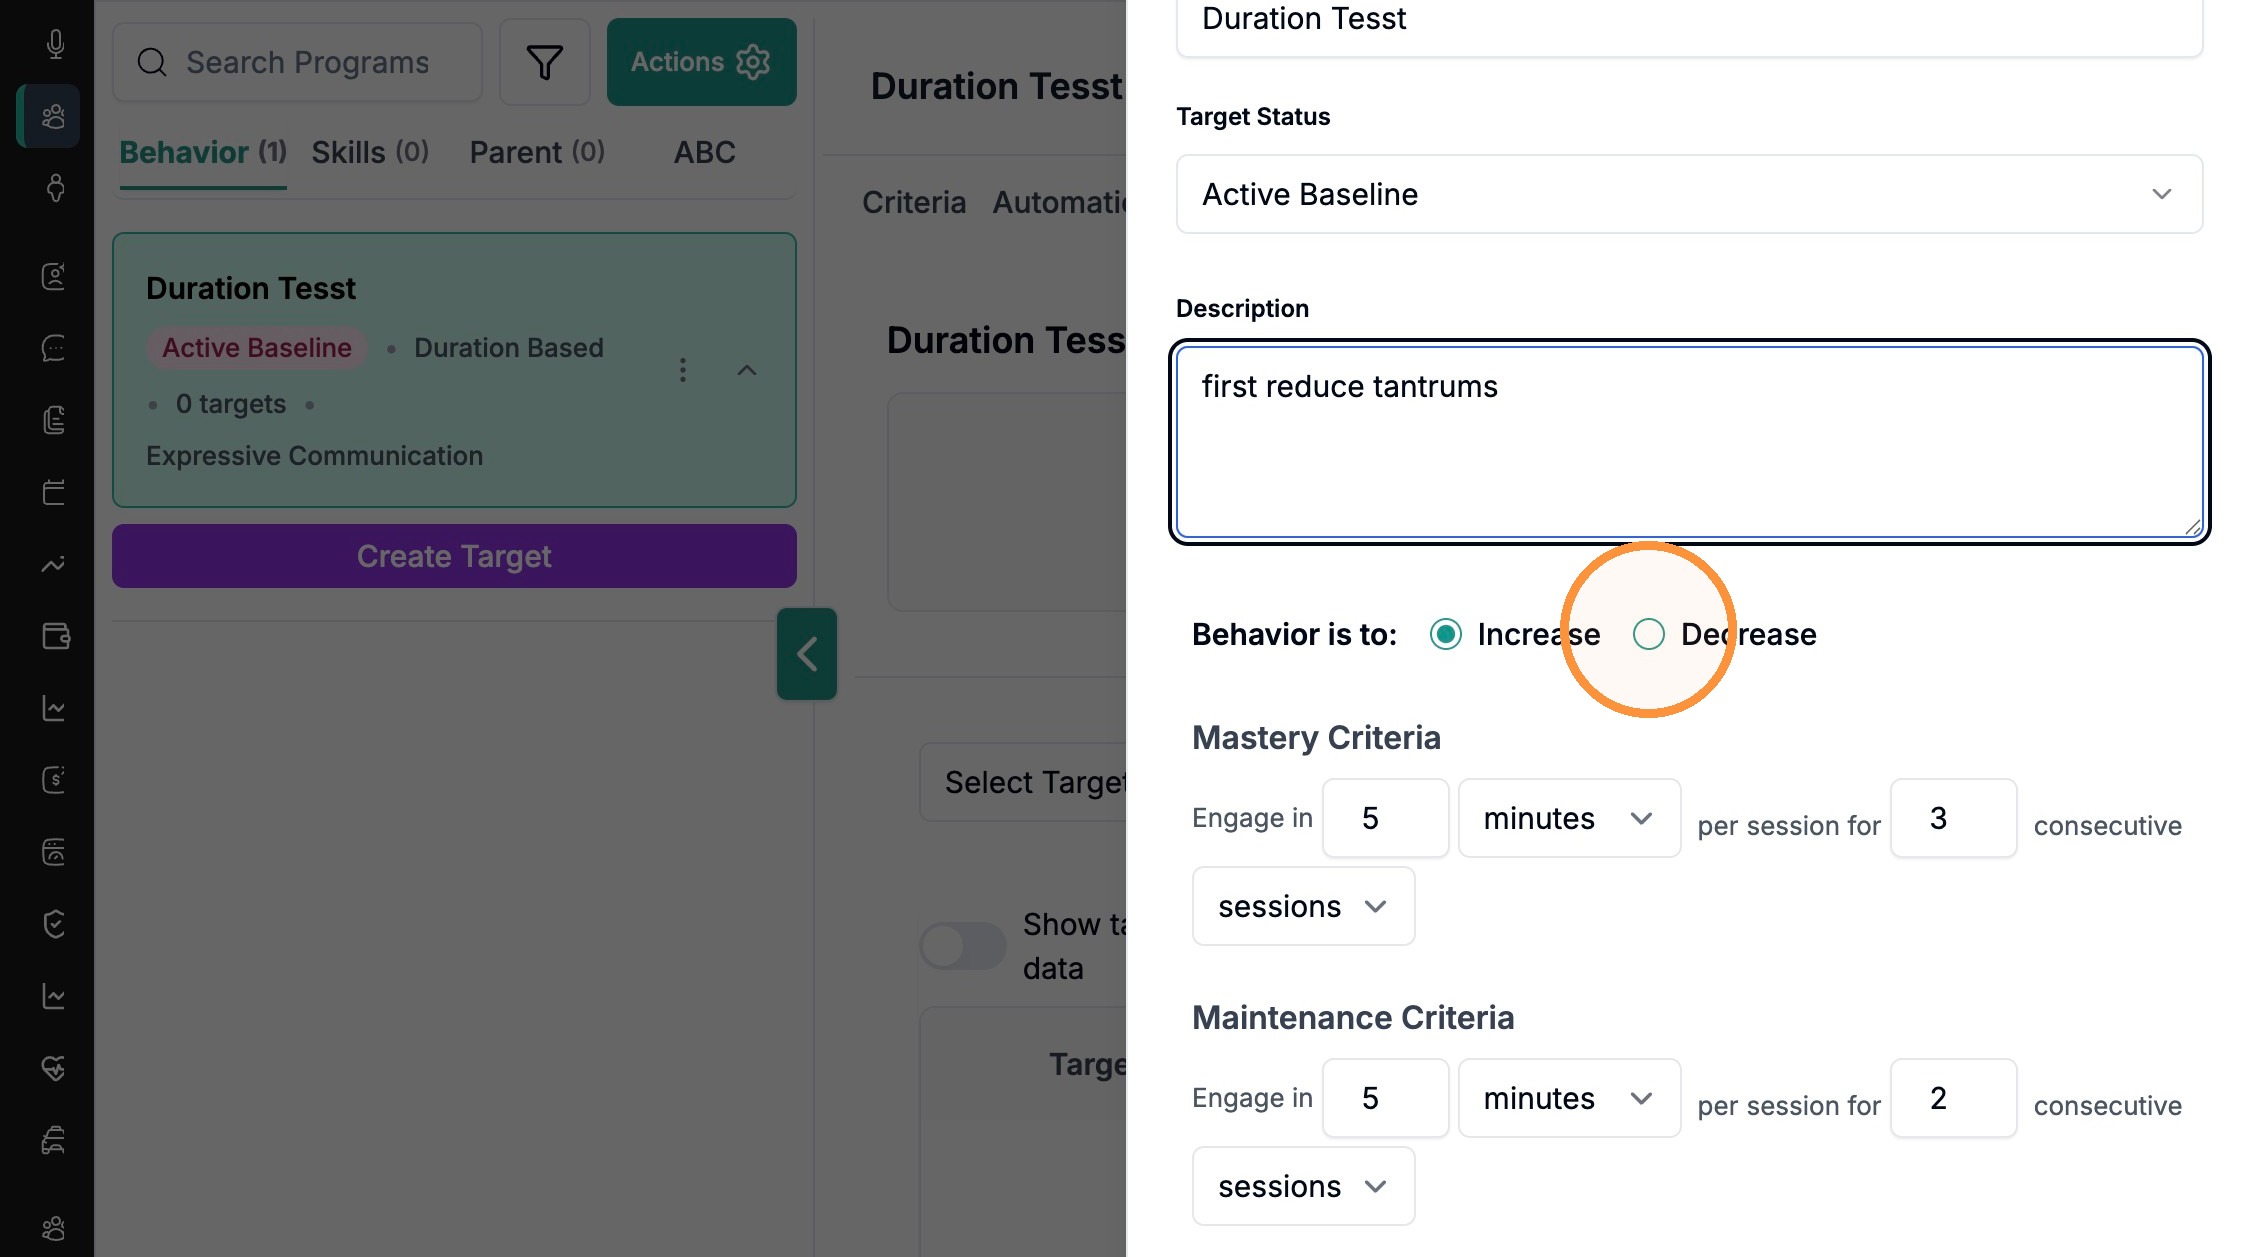
Step 1. Enter a Target Name and Description, and confirm the Target Status.
Step 2. Set “Behavior is to:” to Increase or Decrease. Skill-building targets increase; behavior-reduction targets decrease.
Step 3. Fill in the Mastery Criteria and Maintenance Criteria. These are written as a sentence with editable numbers and units. The exact wording depends on the data-collection type — for example a duration target reads “Engage in 5 minutes per session for 3 consecutive sessions,” while a trials target reads “80% accuracy across 3 consecutive sessions with at least 5 trials per session.”
The Create Target panel: Description, “Behavior is to” (Increase/Decrease), and the Mastery and Maintenance Criteria rows.
Step 4. If the target will move to maintenance, set the Maintenance Schedule. “Every N days / weeks / months / sessions” controls how often maintenance checks are due; Alpaca notifies clinicians when an assessment comes up.
Step 5. Click Create target (top-right of the panel) to save the goal.
TIP To add more targets later, open the program and click the purple Create Target button on its card.
5. Set program-level criteria
Beyond each target's criteria, a program has its own Criteria tab that controls how the whole program advances.
Step 1. Select the program, then open the Criteria tab in the right-hand pane.
Baseline Criteria — “Data required” (a number plus Days/Weeks/Months/Sessions). This advances the overall program from baseline to intervention; it does not advance individual targets.
Program Mastery Criteria — how many targets must be mastered for the program to count as mastered (leave “Default all targets” on to require all of them).
Program Maintenance Criteria — the equivalent threshold for maintenance.
The program-level Criteria tab: Baseline Criteria, Program Mastery Criteria, and Program Maintenance Criteria.

6. Write the protocol directions technicians follow
Protocols are the written instructions your technicians read during a session. You edit them at the program level and at the target level.
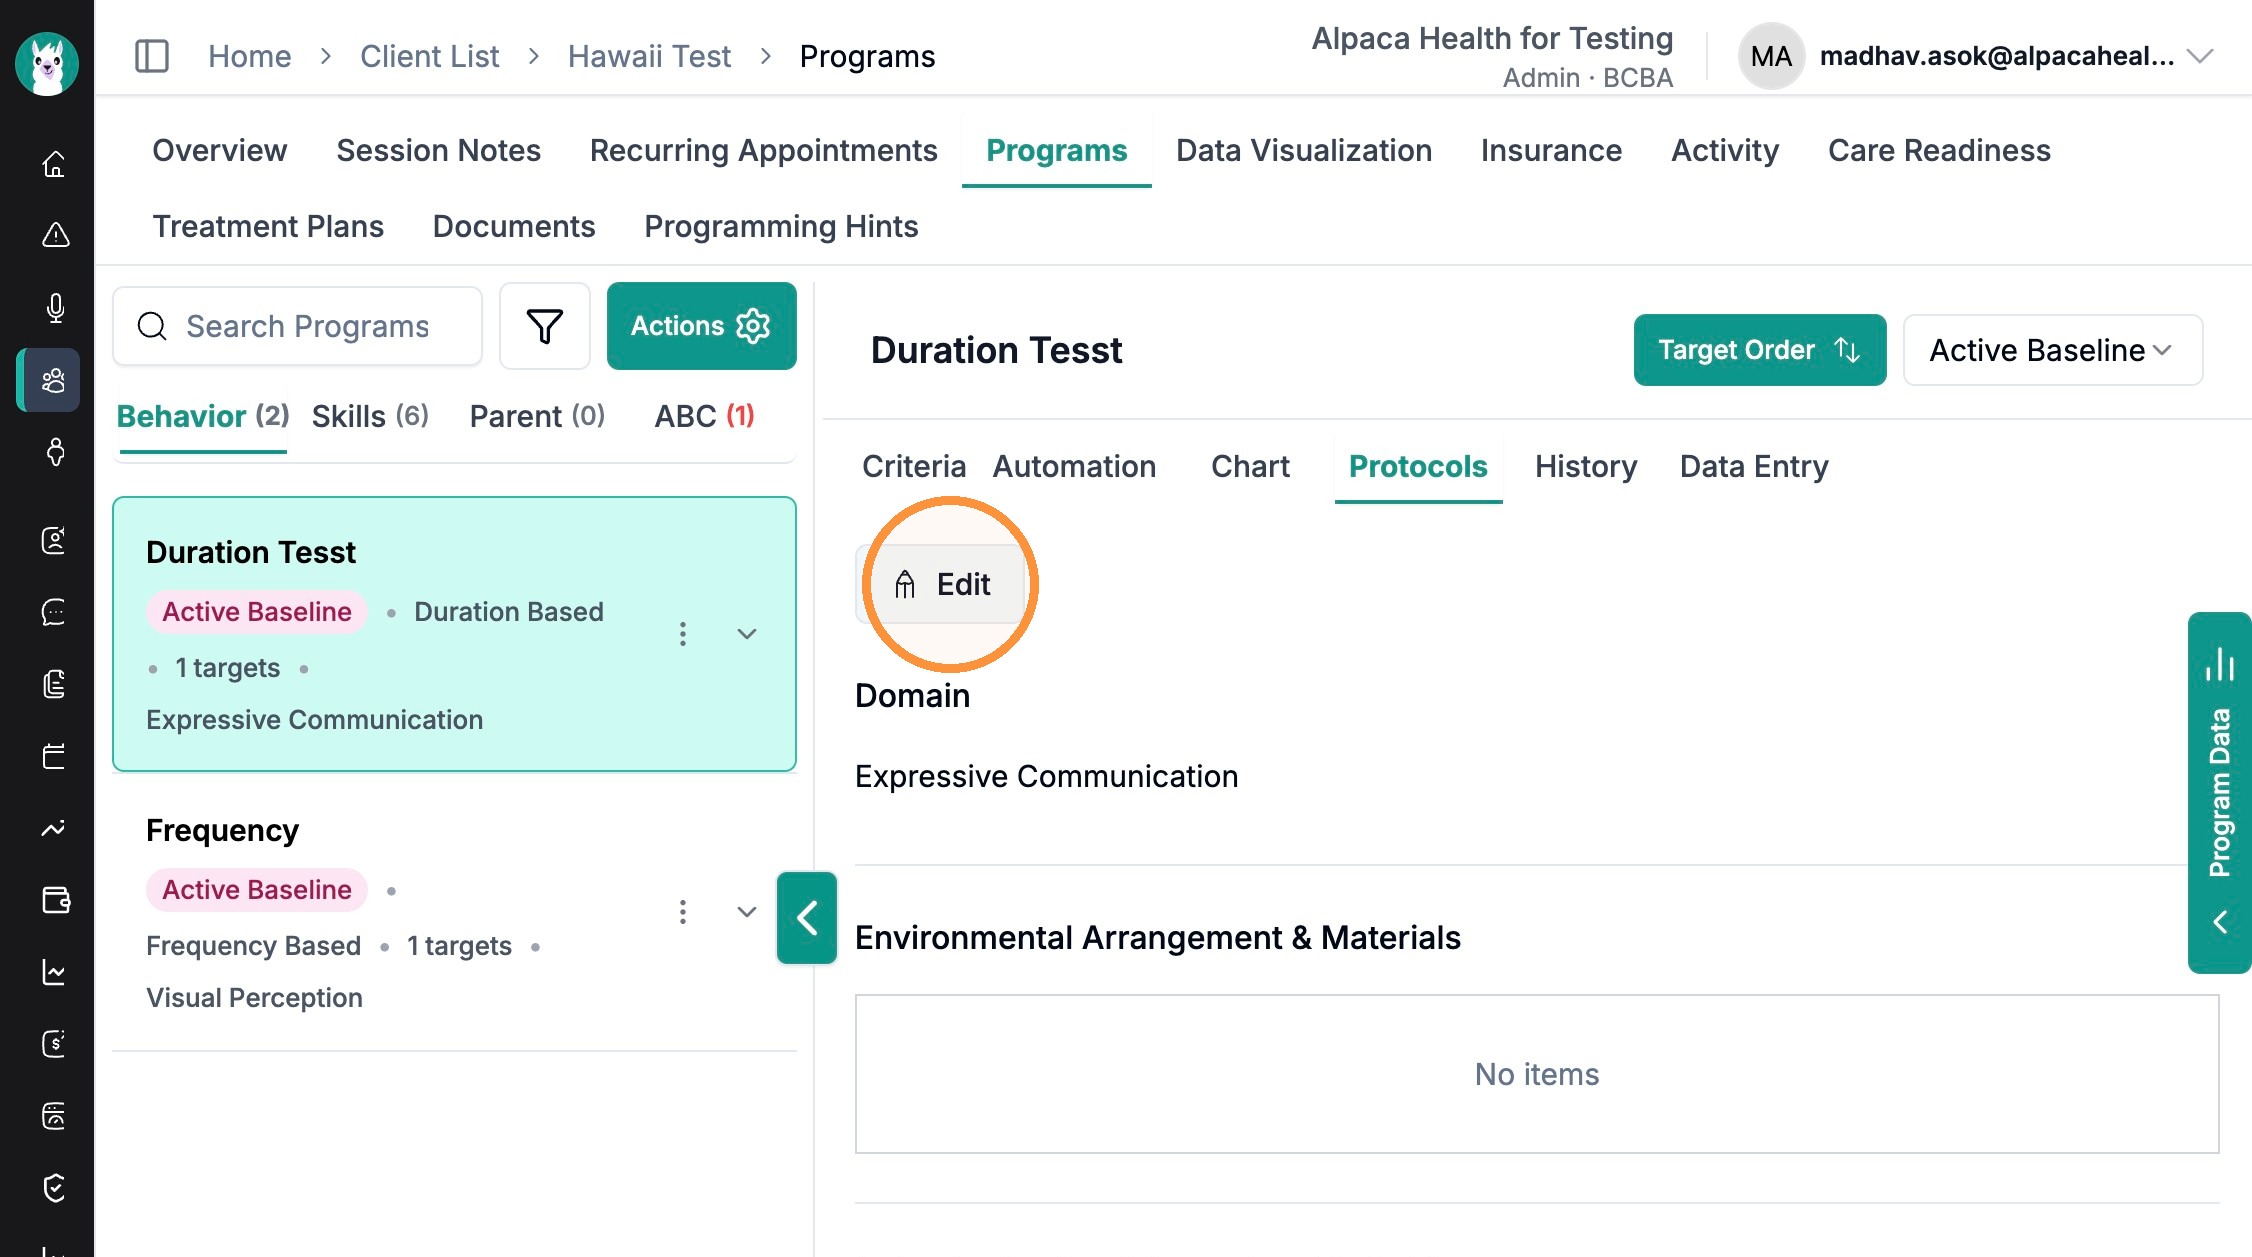
Step 1. With the program selected, open the Protocols tab, then click Edit.
The Protocols tab. Click Edit to open the fields for editing.
Step 2. Complete the program-level protocol fields, then click Save changes. Fields include Behavior Goal and Operational Definition, Antecedent and Setting Event, Functions of Behaviors and Behavior Plan, Antecedent Strategies, Consequence Strategies, and Environmental Arrangement & Materials.
Program-level protocol fields, each a rich-text editor.

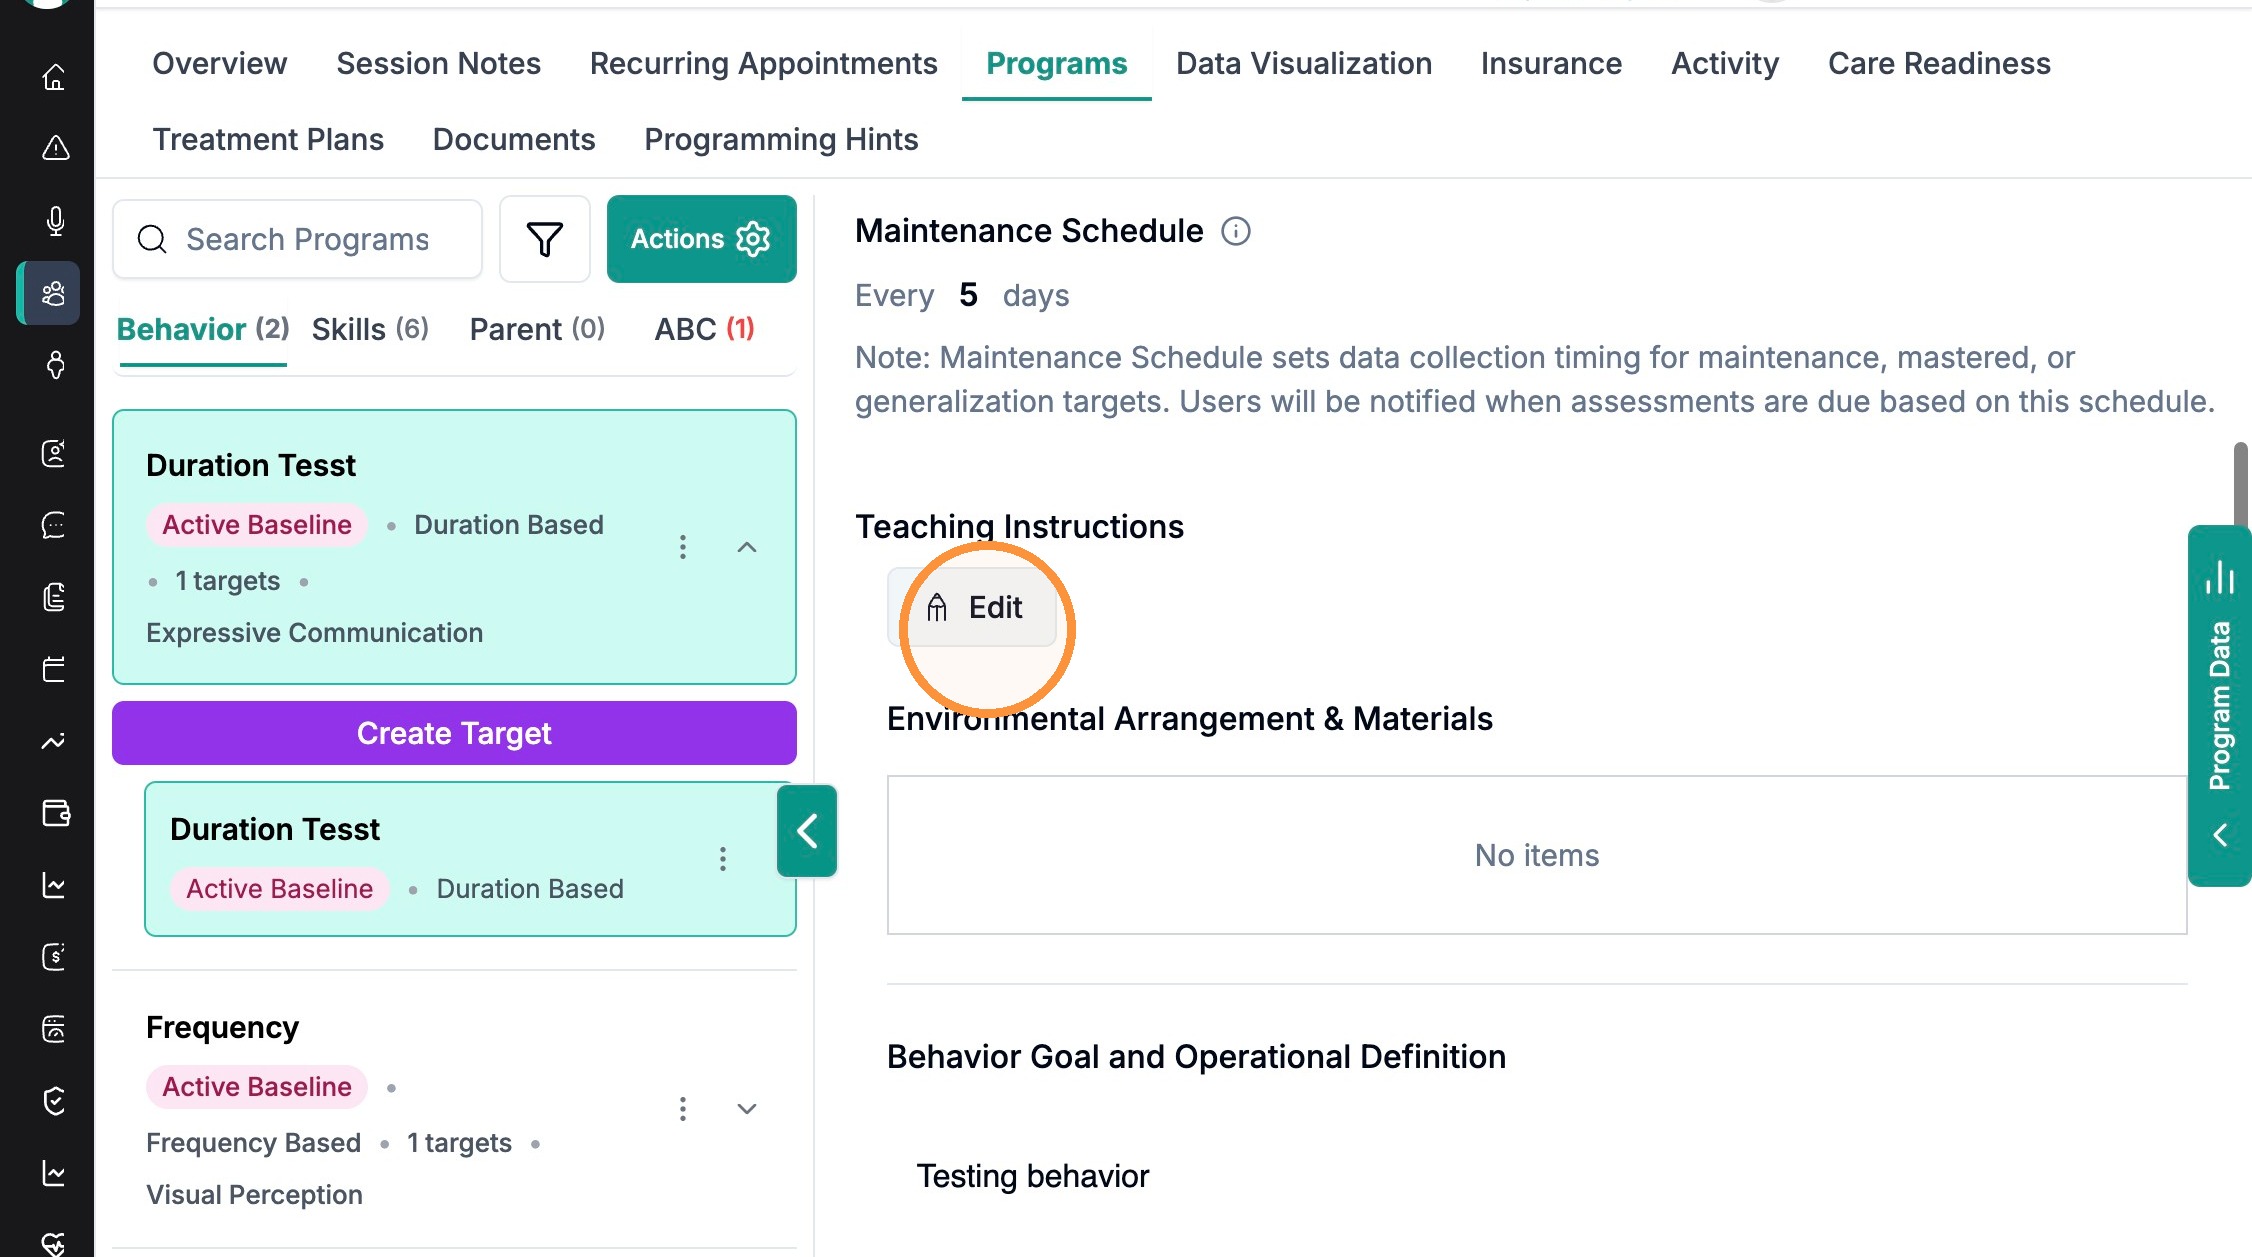
Step 3. To add target-specific directions, select a target and click Edit next to “Teaching Instructions.” Target-level fields add Generalization Procedure, Replacement Strategies, and Crisis Plan. Save changes when done — you'll see “Target protocol updated successfully.”
Target-level protocols, under the “Teaching Instructions” heading with its own Edit button.
NOTE Technicians read all of this during a session by tapping the (i) Program Info button next to a program. See the companion article's “Program Info panel” section.
7. Review and add ABC data
The ABC sub-tab collects Antecedent-Behavior-Consequence observations. Technicians log ABCs during sessions; you review them here and can also add one manually.
Step 1. Click the ABC sub-tab above the program list. New observations appear under ALL OBSERVATIONS with a “Pending review” status until you review them; the ABC Frequency chart summarizes antecedents and consequences.
The ABC tab: the observations list on the left, the ABC Frequency chart and “+ Add ABC” button on the right.

Step 2. To add one manually, click + Add ABC and complete the form. Choose a Session option (“Link to session” or “Record independently,” which reveals a date picker), then pick the Antecedent, Behavior (required — drawn from the client's behavior programs), and Consequence, and add any notes. Click Save.
The Add ABC Observation form: Session, Antecedent, Behavior, Consequence, and Notes.

TIP Check off / review each new ABC so your team knows it has been accounted for.
8. Reuse programs with templates and the Program Library
You don't have to build every program from scratch.
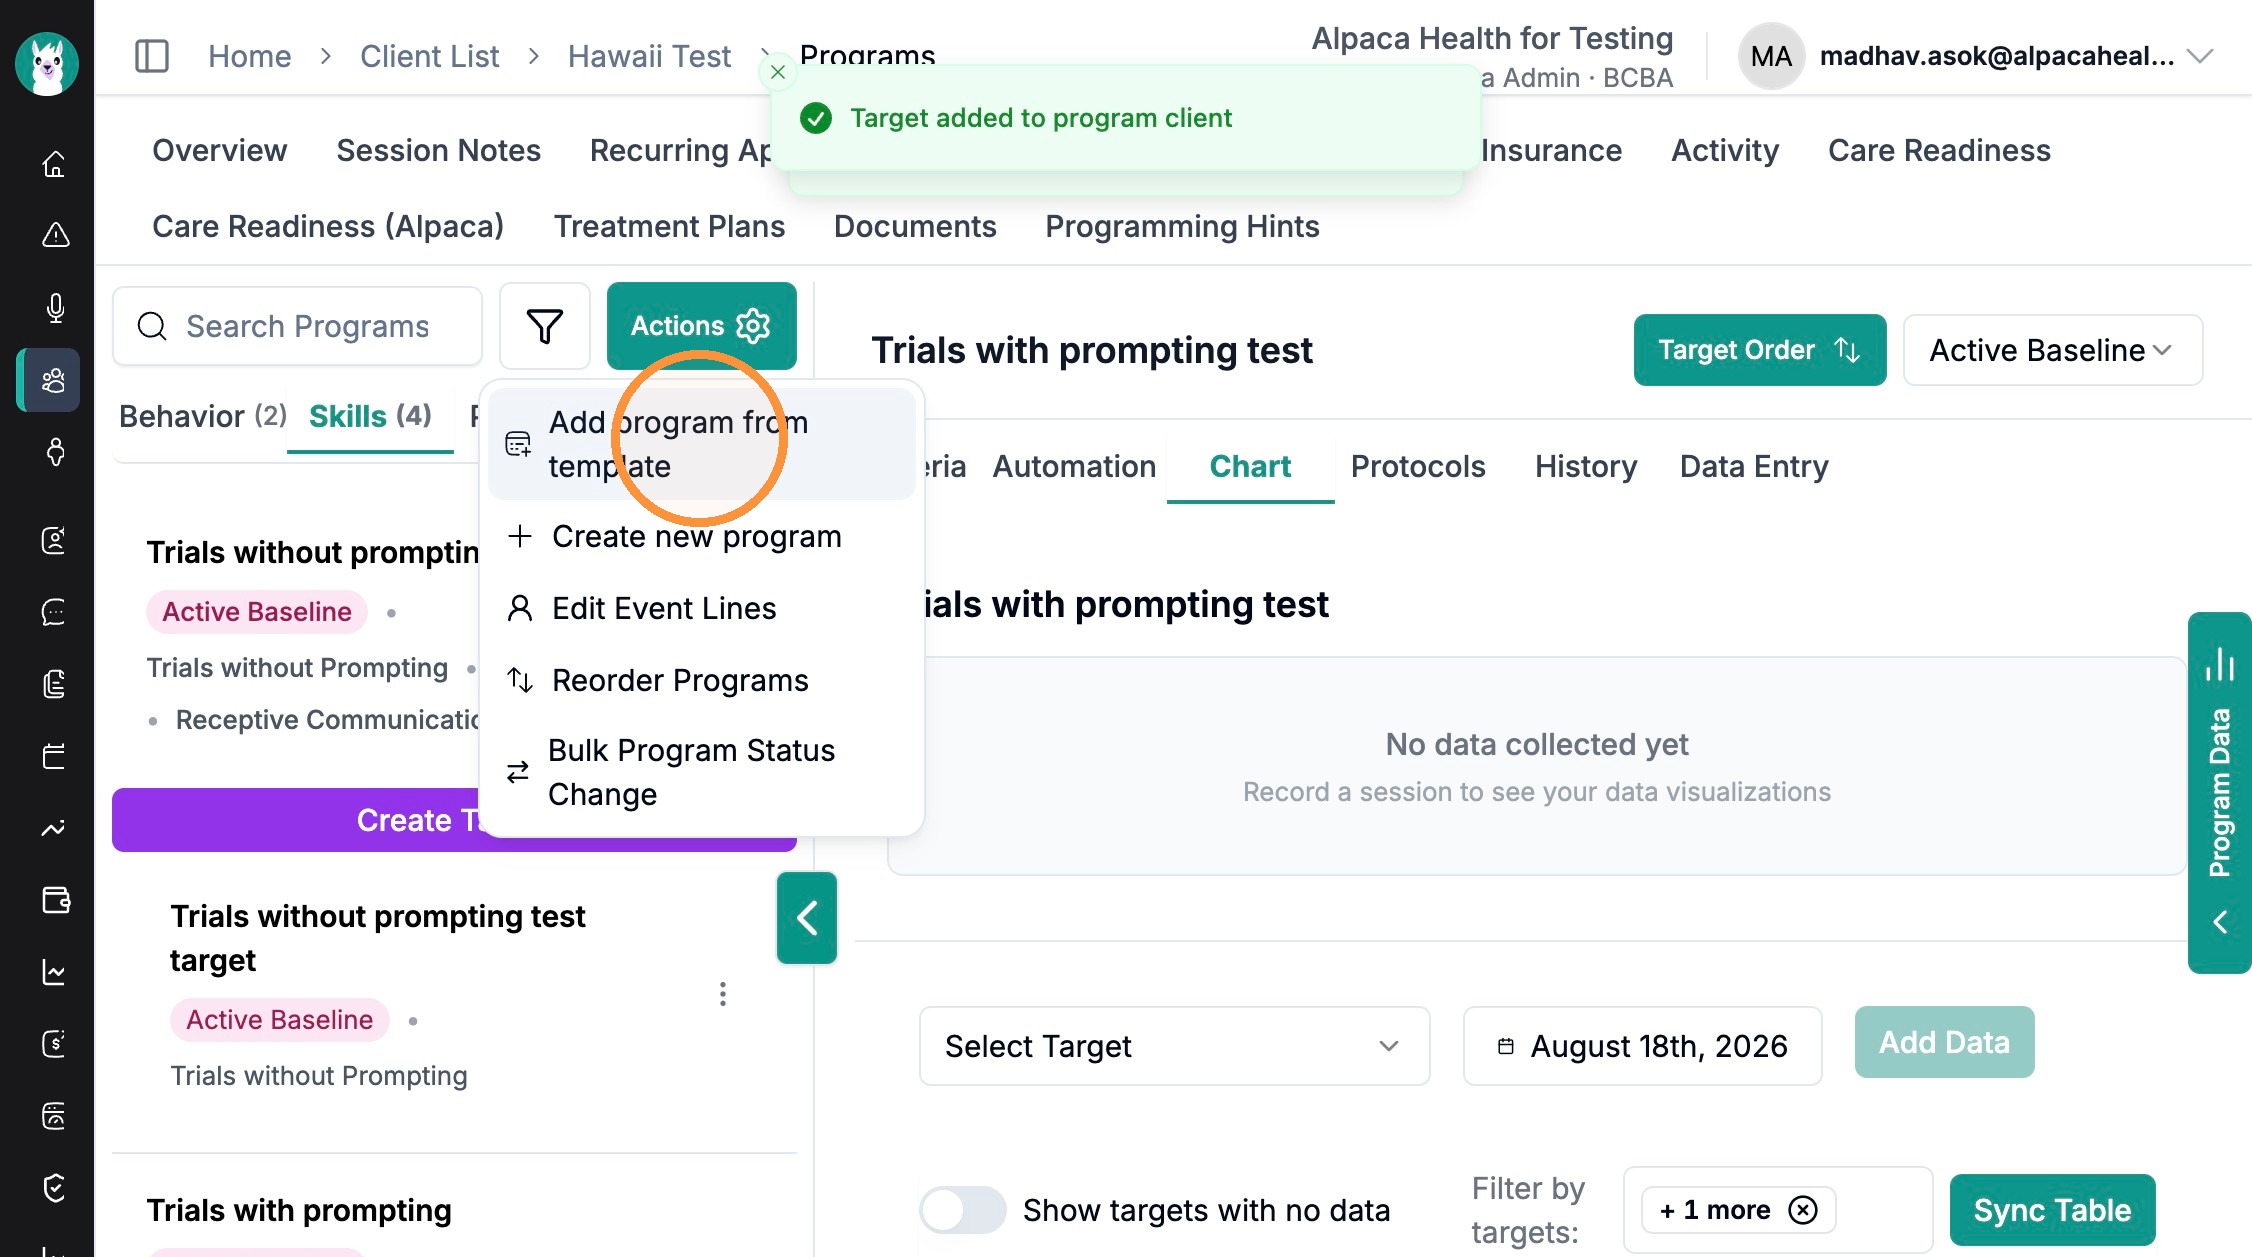
Step 1. From the program list, click Actions → Add program from template to drop a pre-built program onto this client.
The Actions menu. “Add program from template” starts a program from a saved template.
Step 2. To manage the templates themselves, open Program Library in the left sidebar under “Organization.” Build reusable skill-acquisition, behavior-reduction, and parent-training programs there so your whole team can pull from a consistent curriculum.
9. Reorder programs for data collection
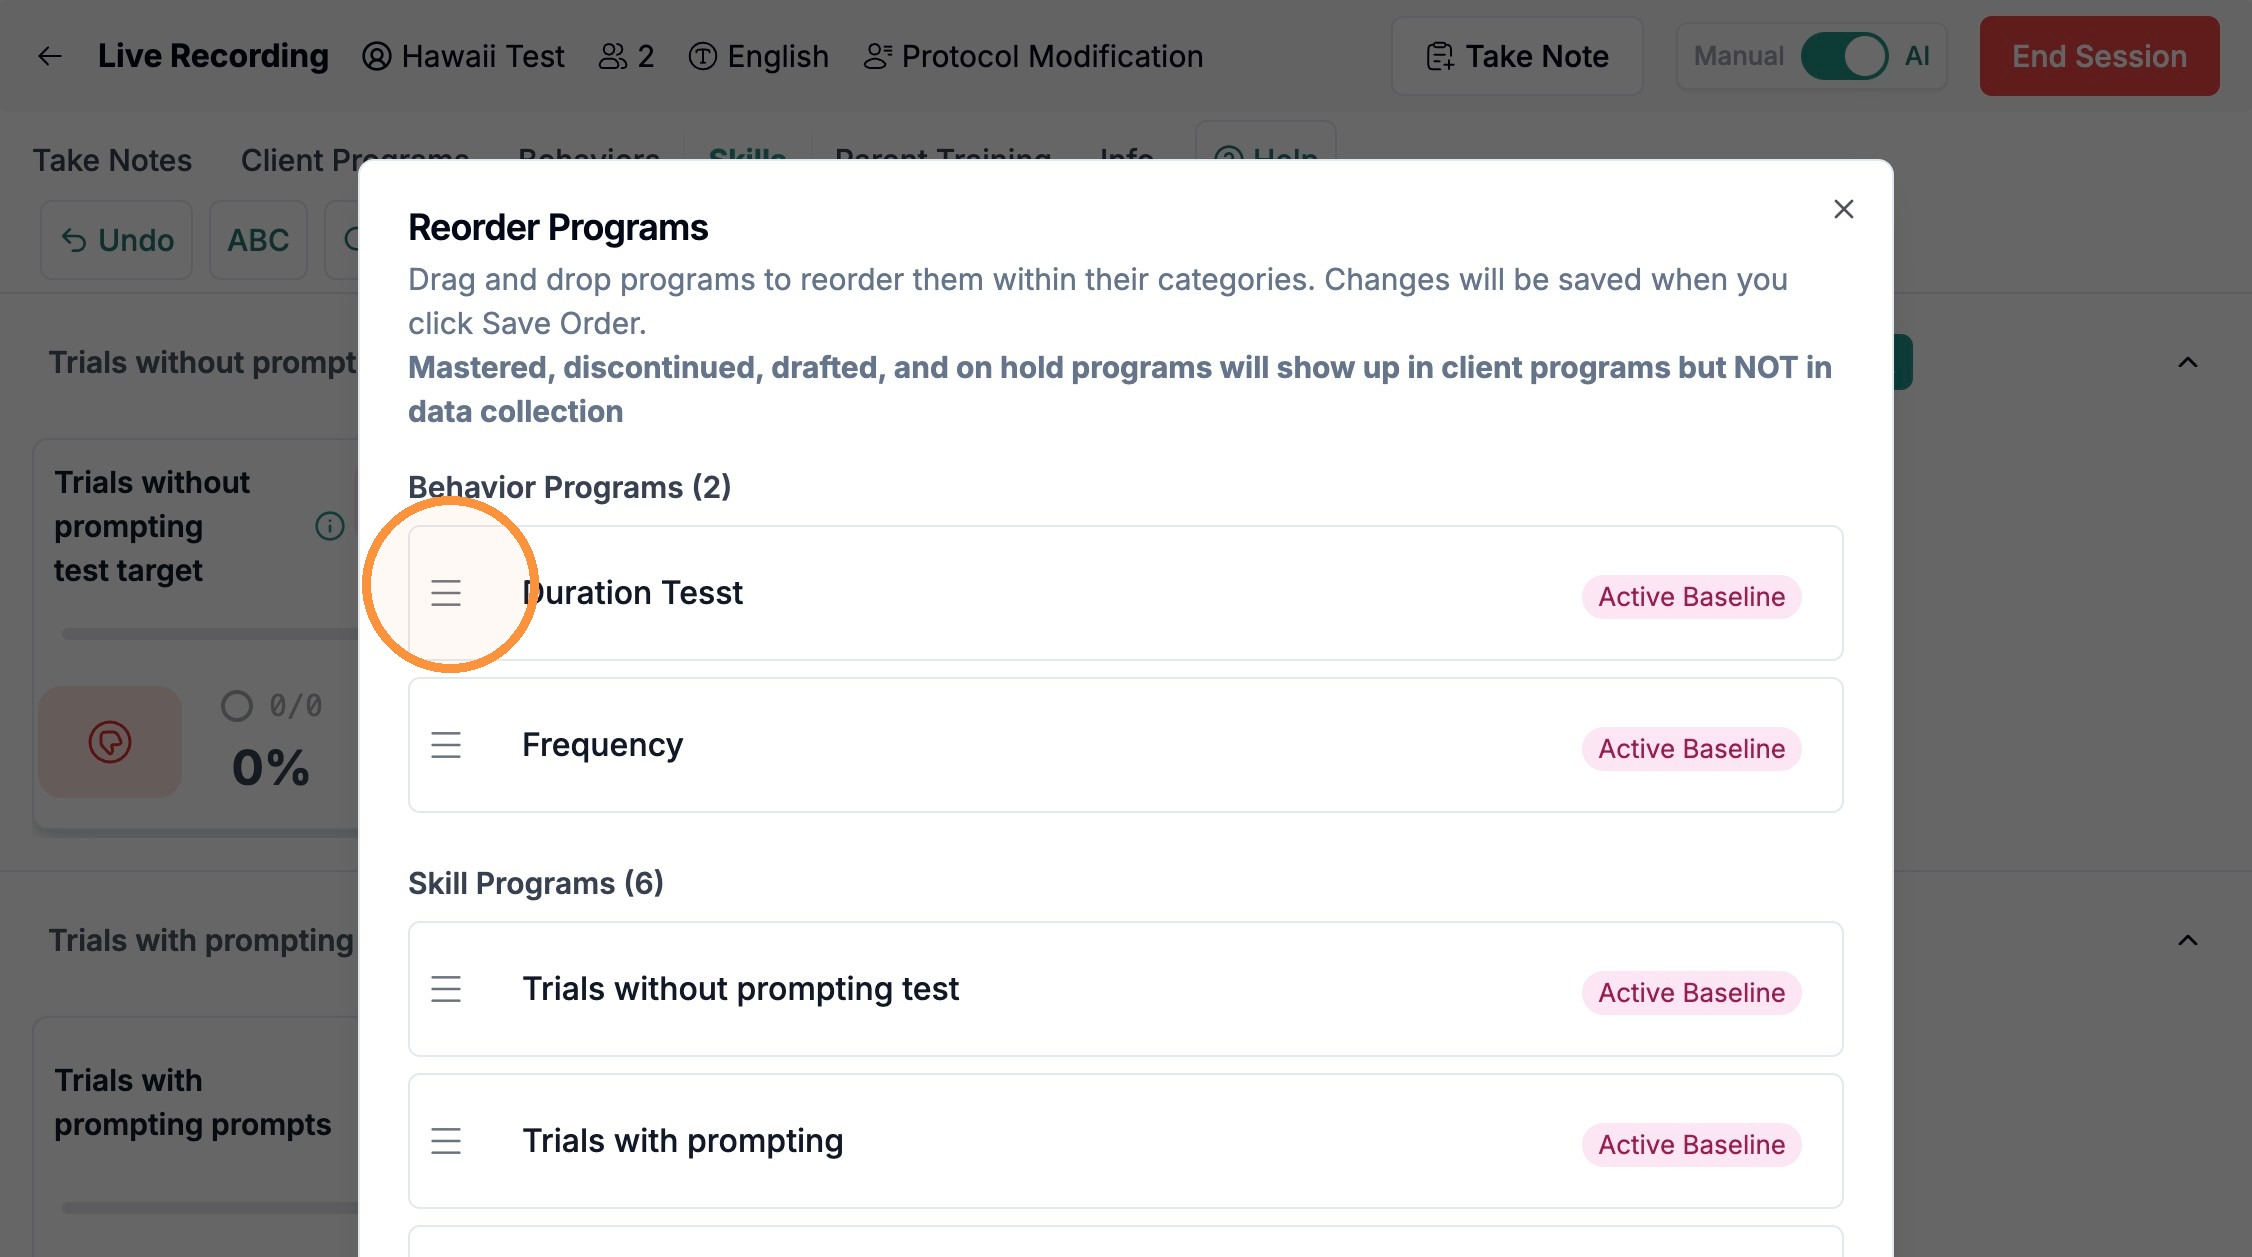
Step 1. Click Program Order (or Actions → Reorder Programs), drag programs within their categories, then click Save Order. The order you set here is the order technicians see during data collection. Mastered, discontinued, drafted, and on-hold programs still show in the client's program list but not during data collection.
The Reorder Programs dialog — drag to reorder, then Save Order.
10. What else you can do from Programs
The Programs workspace also supports work that continues after your programs are built:
Graphing — open a program's Chart tab to visualize performance; split by target or clinician, and add phase-change lines and event lines to mark changes.
Editing raw data — correct individual data points directly (see the “Add, Edit, and Delete Data” article).
Reassessments — use the reassessment generator to compile client history into a report.
AI treatment plans — the treatment-plan generator drafts sections such as medical history (see the “Use Our Treatment Plan Generator AI” article).
To-dos & maintenance transitions — capture reminders during protocol-modification sessions, and when a program is ready, review its graph and move it to maintenance.
Cautionary notes
Double-check data accuracy before finalizing any program, criteria, or report.
Keep your Program Library current so templates reflect your current clinical practices.
Remember which statuses hide a program from data collection (Mastered, Draft, Future, On Hold, Discontinued) so active work stays visible to technicians.