Using Guided Consultations

Last updated: July 21, 2026

Guided Consultations: How to Conduct an Intake Call and Accept a Referral

What Is a Guided Consultation?

When Alpaca matches a new client to your practice, the referral appears on your Referrals page. The guided consultation feature walks you through everything you need to do during and after your first call with the family — from introductions to document collection to scheduling the initial assessment.

Think of it as a checklist and script combined: it keeps you on track during the call, helps you collect what's needed from the family, and lets you accept or decline the referral when you're ready.


How to Start a Guided Consultation

  1. Navigate to the Referrals page from the left-hand menu.

  2. Find the pending referral you want to work on.

  3. Click the green Start Consult button on that referral's row.

  4. You'll be taken to the consultation page for that referral.


Page Layout

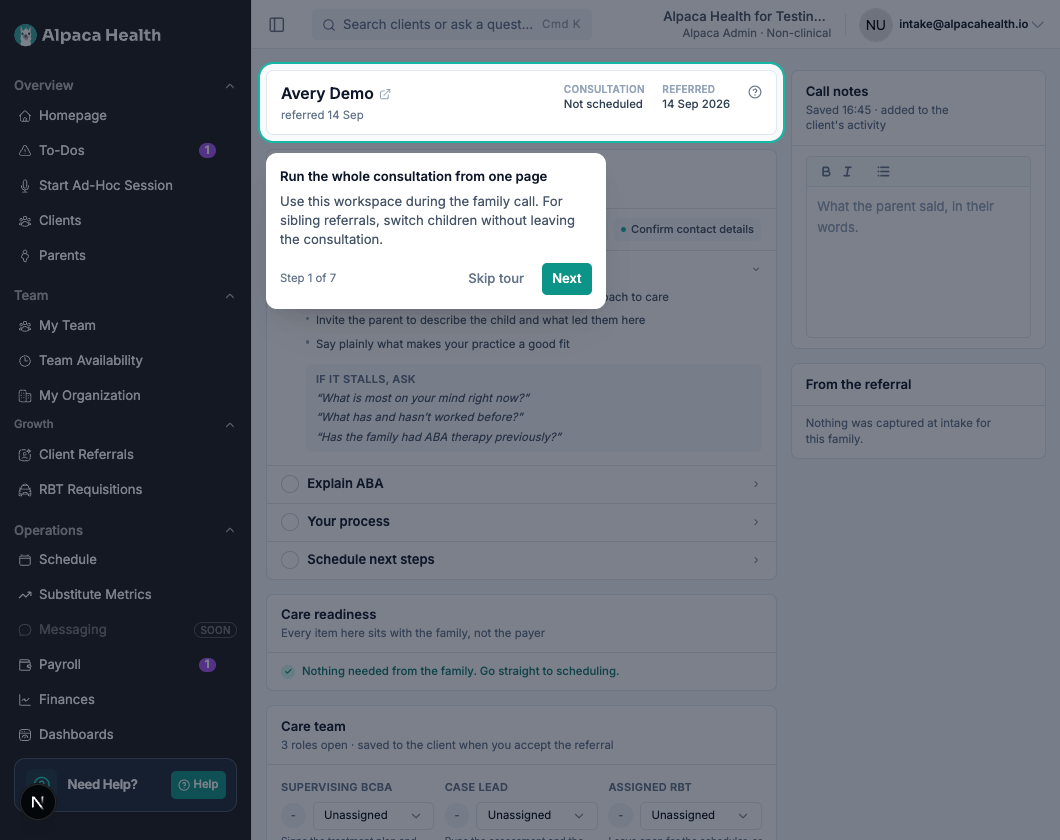
The consultation page is split into two sides:

  • Left side — the Intake Call Guide (a script to follow during your call)

  • Right side — action items you need to complete (parent invite, documents, notes, availability, etc.)

At the top of the page is a progress checklist that tracks what's been completed and what still needs attention. Incomplete items are highlighted in yellow so you can spot them at a glance.


Step-by-Step Guide

1. Follow the Intake Call Guide (Left Panel)

The left panel contains an expandable guide with four sections you can open and close as you move through the call:

Introductions

  • Introduce yourself, your background, and your approach.

  • Invite the parent to share about their child — their concerns, what's worked, what hasn't, and any prior ABA experience.

Explain ABA

  • Ask if the parent would like an overview of ABA therapy.

  • Give a parent-friendly explanation tailored to their child's challenges.

  • Describe your care model: whether you use RBTs, how supervision works, recommended hours, and what to expect around intensity.

Explain Your Process

  • Walk the parent through what the assessment looks like — how many sessions, what happens in each one, and how involved the parent will be.

  • Explain what happens after the assessment: staffing, session frequency, duration, and how you'll communicate with the family.

Schedule Next Steps

  • Try to schedule the initial assessment before the call ends.

  • If the parent isn't ready to commit, encourage them to hold a tentative time on their calendar.

  • Avoid ending the call without a clear next step — unscheduled cases tend to go cold.


2. Invite the Parent (Right Panel)

If the parent hasn't been invited to the Alpaca parent portal yet, you'll see an Invite Parent section at the top of the right panel.

  1. Enter the parent's first name, last name, and email address.

  2. Click Send Parent Invite.

  3. An invite link will appear — you can copy it and share it with the parent during the call.

The parent will use this link to create their account on the Alpaca parent portal, where they can upload documents, update insurance information, and manage their account.

Sibling referrals: If the referral includes multiple children, the parent invite is shared across all siblings. You only need to send it once.


3. Check Parent Registration Status

After the invite is sent, this section will show you whether the parent has registered:

  • Pending — The parent hasn't created their account yet. You can click Send Registration Invite to resend the invitation.

  • Registered — A green banner confirms the parent portal is active and shows the parent's email.


4. Gather Documents

The Document Gathering section shows which intake documents are still needed from the family.

If documents are missing:

  1. Click Send Document Upload Link — this generates a secure link and automatically copies it to your clipboard.

  2. Share the link with the parent (via text, email, or during the call).

  3. The parent can use the link to upload their documents directly.

Common documents that may be needed:

  • Insurance card (front and back)

  • Diagnosis report

  • Referral

If a diagnosis report is missing, you'll see a special alert explaining insurance requirements: the diagnosis must be from an MD or Psy.D (not a school psychologist), it should be a long-form report (6+ pages), and it must include a standardized assessment with scoring scales.

When all documents are received, the section collapses into a single green confirmation line.


5. Add Consultation Notes

Use the Consultation Notes section to take notes during or after the call. Notes are saved automatically as you type and are stored per client.

For sibling referrals, each child has their own notes section.


6. Set Service Locations

Click into the Service Locations section to specify where services will be provided for this client (e.g., home, clinic, or telehealth). You can add multiple locations.

This section is highlighted in yellow until at least one location is added.


7. Set Client Availability

Expand the Client Availability section to record when the family is available for sessions.

You have two options:

  • Specific time slots — Add day-of-week and time ranges, with a location type for each (home, clinic, telehealth).

  • Open availability — Mark the client as flexible/open to any time.

This section is highlighted in yellow until availability has been set.


8. Accept or Decline the Referral

When you're ready, use the buttons at the top of the page:

Accepting

  1. Click Accept Referral.

  2. A confirmation dialog will appear explaining that by scheduling an assessment, you are committing to provide services for this client.

  3. Confirm to proceed.

  4. The Schedule Assessment section will appear, where you can book the initial assessment appointment:

    • Select a date, start time, and end time

    • Choose a location type (in-person or virtual — if virtual, you'll need to provide a meeting link)

    • Assign a clinician

    • Optionally assign an RBT

    • Choose whether to notify the client and/or clinician

  5. Click Confirm Schedule to finalize.

  6. You'll be redirected to your client list.

Declining

  1. Click Decline Referral.

  2. A warning will appear: once you decline, you'll lose access to this client's information.

  3. If you proceed, you'll be asked:

    • Should Alpaca try to match the family with another provider?

    • Why are you turning down this client?

    • What type of client would be a better fit for your practice?

  4. Submit your answers to complete the decline.

  5. You'll be redirected back to the Referrals page.

Sibling referrals: Accepting or declining applies to all children in the referral. You cannot accept one sibling and decline another.


Sibling Referrals

If a referral includes multiple children from the same family, the consultation page adapts:

  • A banner at the top explains that the referral includes siblings.

  • A tabbed interface lets you switch between children. Each tab is color-coded (teal and purple) for easy distinction.

  • Per-child sections (document gathering, notes, service locations, and availability) are tracked independently for each child.

  • Shared sections (parent invite and parent registration) apply to the whole family.

  • The progress checklist at the top shows completion status for each child separately.


Progress Checklist Reference

The checklist at the top of the page tracks these items:

ItemComplete When

Parent registered

Parent has created their account on the parent portal.

Docs received

All required intake documents have been uploaded.

Availability

At least one time slot is set, or open availability is selected.

Location

At least one service location has been added.

For sibling referrals, docs, availability, and location are tracked per child.


Frequently Asked Questions

Do I need to complete everything in one sitting? No. Your progress is saved automatically. You can leave the page and come back later by clicking Start Consult on the same referral from the Referrals page.

What if the parent doesn't register after I send the invite? You can resend the registration invite from the Parent Registration section. If the parent is having trouble, direct them to secure.alpacahealth.io.

Can I take the call without the guide? Yes. The Intake Call Guide is there to help, but the sections are collapsible. You can close them if you prefer to run the call your own way. The important part is completing the action items on the right side.

What happens after I accept and schedule the assessment? Alpaca begins the onboarding process — insurance setup, parent notifications, and internal tracking are handled automatically. The client will appear in your client list, and the assessment appointment will show on your calendar.

What if I need to refresh the page to see updated information (e.g., after a parent uploads documents)? Click the Refresh Data button at the top of the page to pull the latest information without losing your place.

Can I decline a referral after I've already accepted it? No. Once you accept a referral and schedule the assessment, the decision is final. Contact your Alpaca support representative if you need to make changes.