2.2 Add New Team Members (including RBTs and BCBAs)
Last updated: September 24, 2026
Adding a team member is how you bring an RBT, BT, or BCBA into your practice so they can be scheduled, collect data, and get paid. You do it from the My Team page by tapping Invite Team Member, which opens a guided form with five short steps: Person, Employment, Compensation, Details, and Review. Nothing is sent until you review it, and you can jump back to any step you have already passed. When you finish, Alpaca emails the new hire an invite that walks them through onboarding and starts their payroll setup.
What You'll Need Before You Start
Their name and work email
The job title you are hiring them into (RBT, BCBA, and so on)
The access level they should have in Alpaca
Their pay structure and rates (or salary)
Where they will work (work location and state)
For credentialed roles: NPI and CAQH login
Which leave policies to assign them (if you have set any up)
Who can do this: practice admins, directors, assistant admins, and office/HR staff. If you open the page and see "You can't invite team members", ask an admin at your practice to invite the person or to give you team management access.
Step 1: Who You’re Inviting
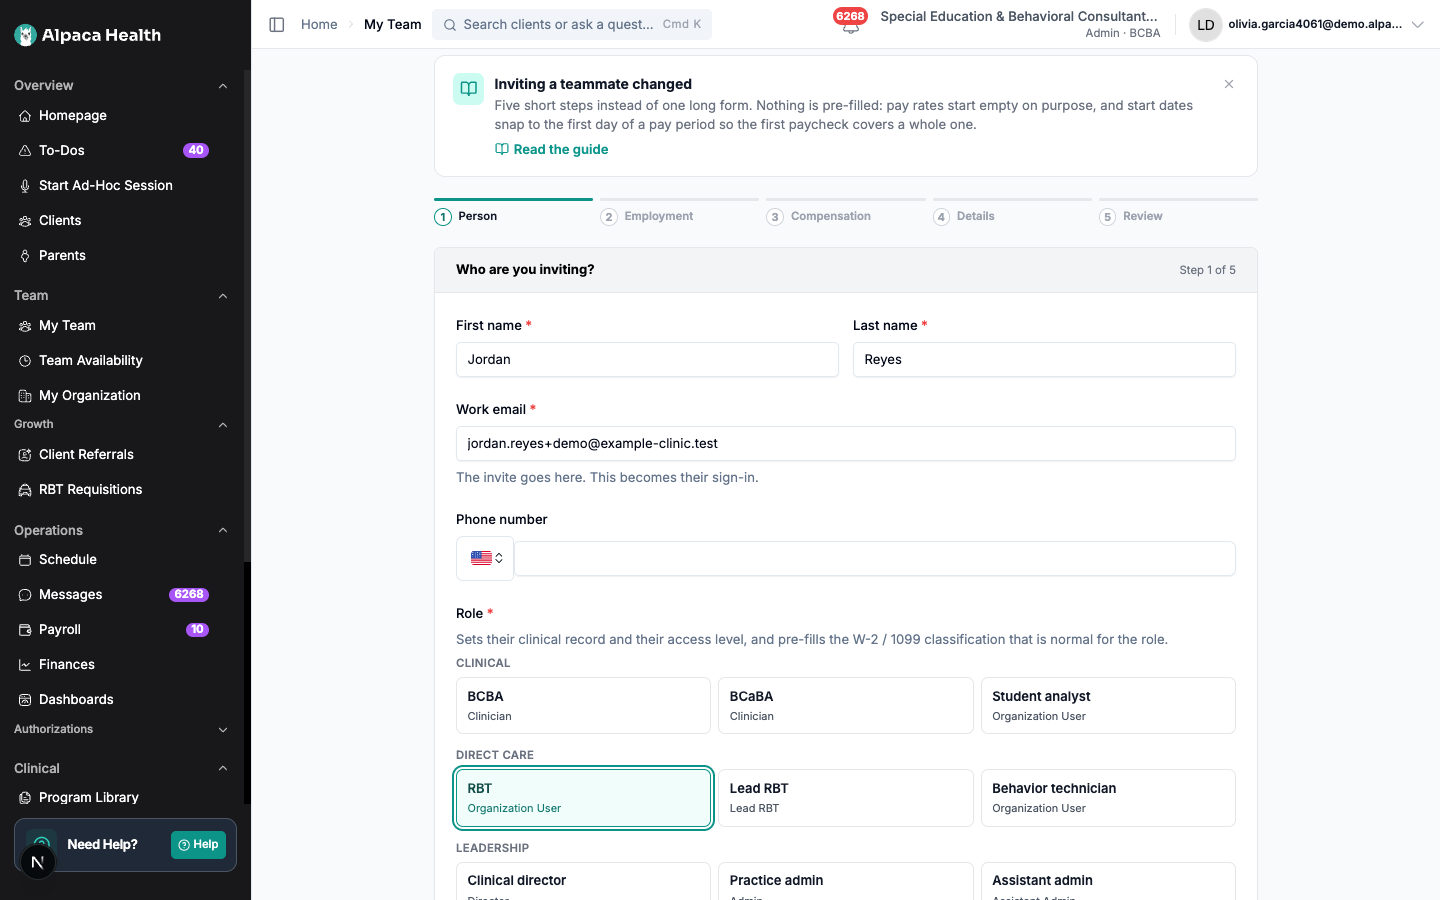
First Name, Last Name, Work Email (required). The invite goes to that email, and it becomes their sign-in.
Phone Number (optional).
Role. Pick the job title you are hiring them into. This is the most important choice on the page, because it sets three things at once.
Access level. Pre-filled from the job title. Change it if this person needs more or less than the title normally carries — a BCBA who also administers the practice, for example. See 2.1 Understand user roles & permissions.
Picking a job title sets:
Their clinical record — whether Alpaca knows them as an RBT, a BCBA, a BCaBA, a behavior technician, and so on. Supervision percentages and RBT-eligibility reporting are built on this, so a wrong title here shows up later as wrong supervision numbers.
Their access level — what they can reach in Alpaca.
A suggested W-2 / 1099 classification — the one that is normal for that title. You can change it on the next step.
If the email is already in use, Alpaca tells you straight away rather than at the end of the form, and suggests an address that adds an extension to the same inbox — mail still lands in their normal inbox. One Alpaca account cannot belong to two organizations yet, so someone who already works at another practice on Alpaca needs a second address.
Step 2: Classification and Start Date

Worker classification: W-2 Employee or 1099-NEC Contractor. Alpaca pre-selects whichever is normal for the job title. If you choose the other one you will see a note saying it is unusual for that role — that is a prompt to double-check, not a block. The classification is a legal and payroll decision, and it is yours to make.
Employment type: Full Time or Part Time.
Compensation structure: Hourly or Salary. This decides which pay fields you fill in on the next step.
Overtime eligible toggle. Most hourly staff are eligible.
Start date works differently from an ordinary date field. You choose a pay period, not a calendar day. Each option shows the period it opens and when the first paycheck lands:
The first option is the period already under way. It is the soonest they can start, and their first paycheck covers only part of a period.
The next option is marked Most common — starting on a clean period boundary means their first paycheck covers a whole period.
Options marked Not yet on the payroll calendar are estimates rolled forward from your current schedule. The start date itself is firm; treat the check date as approximate.
This date becomes their hire date and anchors their payroll contract to a real payroll boundary. If you see "No payroll calendar found", the pay periods could not be loaded — you can still type a date. Choose the first day of a pay period if you know it, or contact support@alpacahealth.io.
Leave time policies appears when your organization has active policies. Pick which policies this hire accrues under, or None if they do not accrue (see Leave Time Policies below).
Step 3: Pay Rates
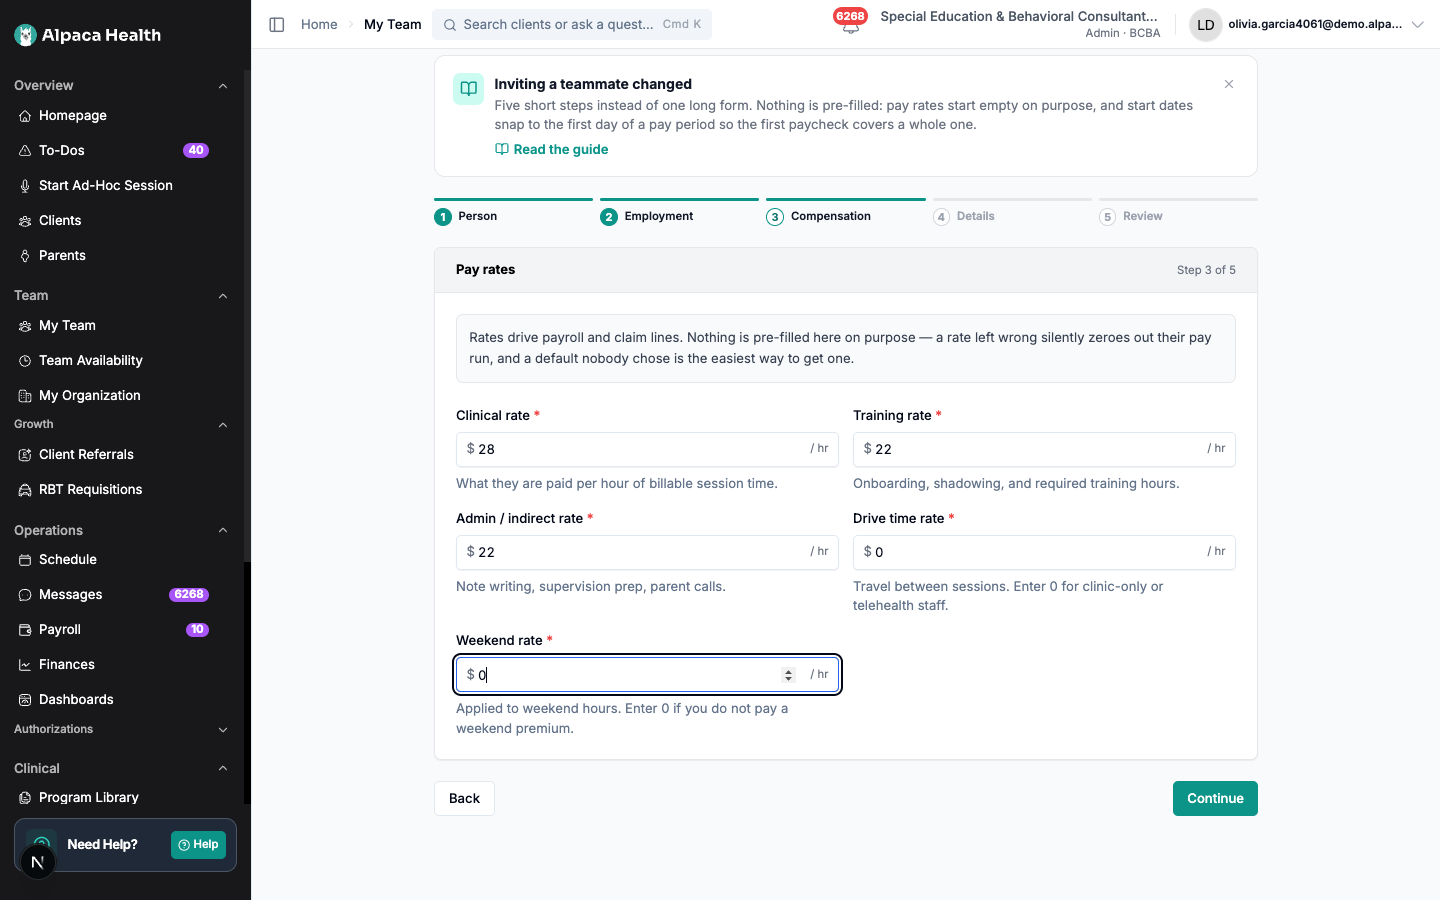
Nothing is pre-filled here, on purpose. Rates drive payroll and claim lines, and a default nobody actually chose is the easiest way to pay someone the wrong amount for months.
If you chose Hourly, Alpaca tracks a separate rate for each kind of time:
Clinical rate — each hour of billable session time.
Training rate — onboarding, shadowing, and required training hours.
Admin / indirect rate — note writing, supervision prep, parent calls.
Drive time rate — travel between sessions.
Weekend rate — weekend hours, if you pay a premium.
Clinical, training, and admin must each be above $0. Drive time and weekend can be 0, but you have to enter the 0 — leaving them blank is not the same as saying zero. Enter 0 for drive time if this person is clinic-only or telehealth.
If you chose Salary, you will see a single annual salary field instead.
Step 4: Payroll Location and Credentials
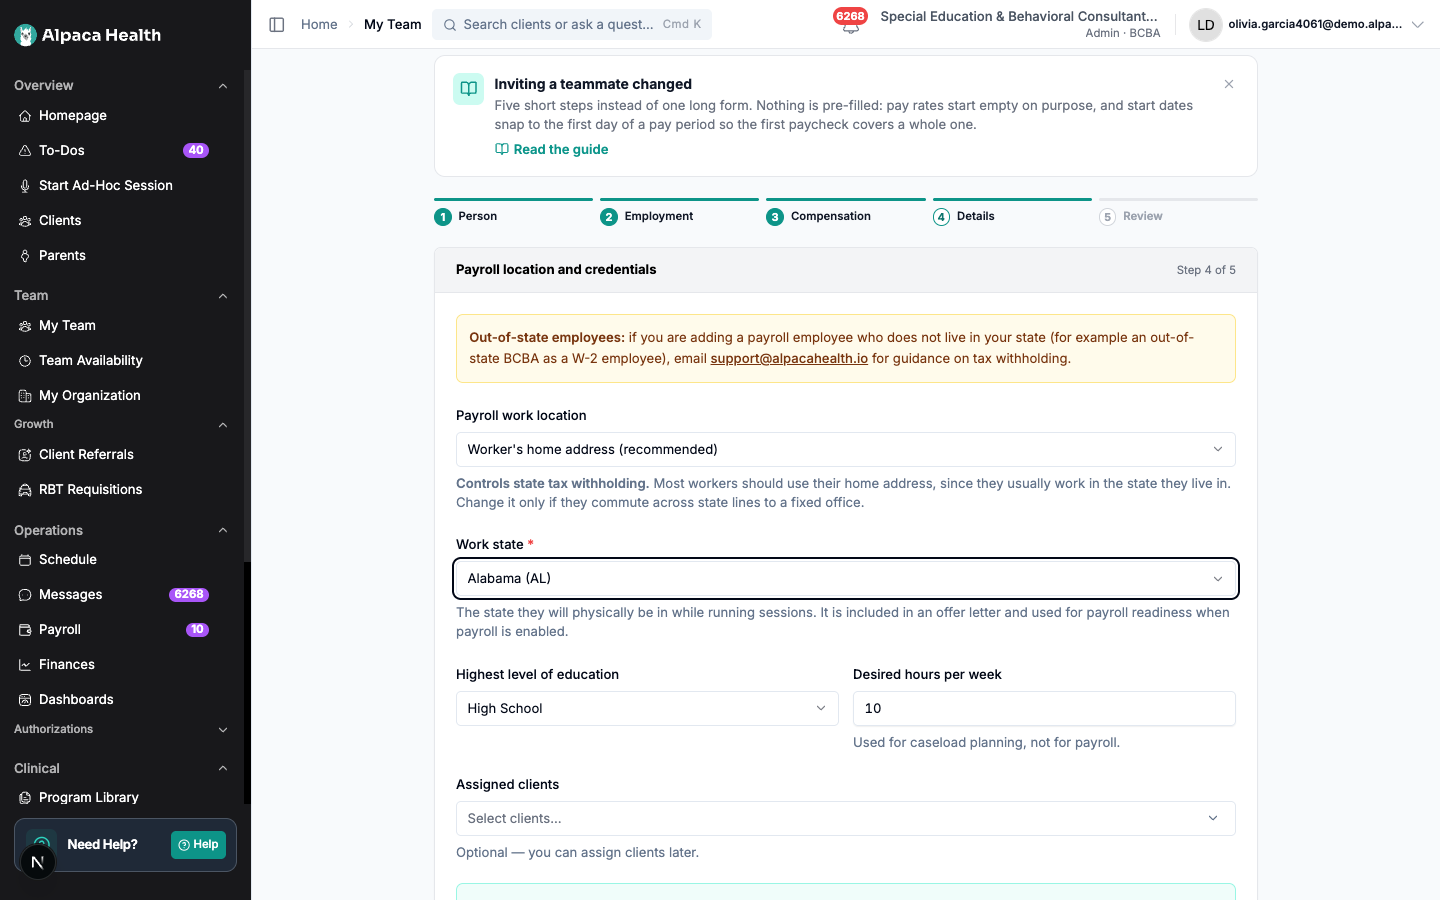
Work location is where you set state taxes.
Payroll work location. Choose the worker's home address (recommended for most in-home clinicians) or a fixed employer location. Change it from the home address only if they commute across a state line to a fixed office.
Work state. The state they will physically be in while running sessions.
Set these to where the person actually works. Work location and work state determine which state's payroll taxes apply to them. If you enter the wrong state or address, it can trigger tax obligations and agency notices in the wrong state, so get it right when you add them. If you are adding a payroll employee who does not live in your state — an out-of-state BCBA as a W-2 employee, for instance — email support@alpacahealth.io for guidance on withholding before you send the invite.
Highest level of education. Important to get right to ensure correct billing.
Desired hours per week. Used for caseload planning, not for payroll.
Assigned clients (optional). You can assign clients now or later.
Credentialing (optional): Staff NPI, CAQH ID, CAQH username, and CAQH password. Enter these for anyone who needs to be credentialed so Alpaca can drive their payer contracting. You can add them later on their profile if you do not have them yet.
Step 5: Review and Send
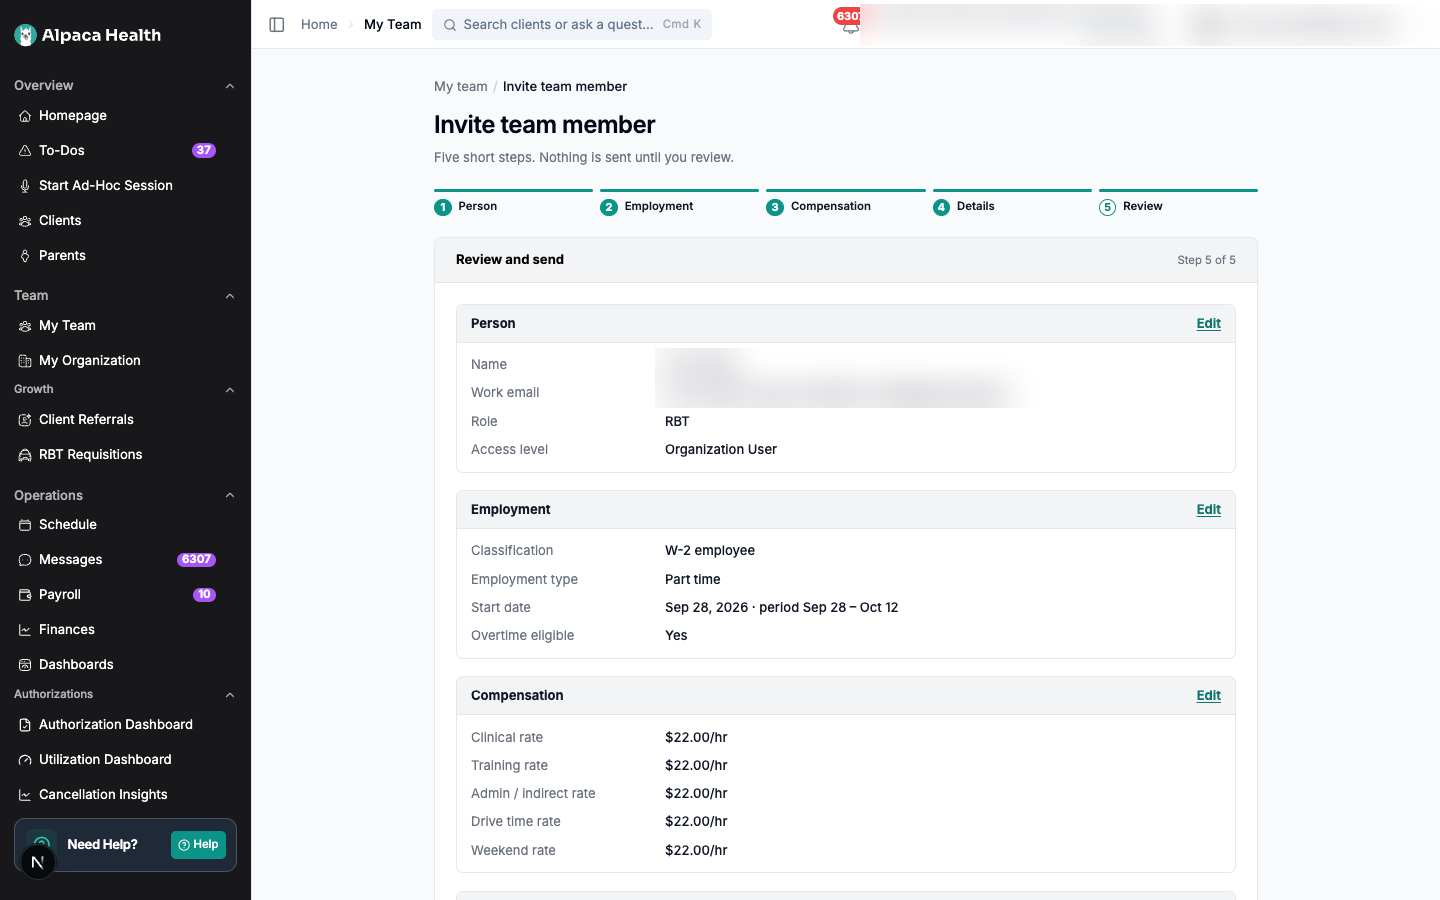
Everything you entered is grouped here with an Edit link per section. Alpaca re-checks the whole form when you tap Send invite, not just the last step — if you jumped back and cleared something, you will be told before anything is sent.
You can send an offer letter from either a direct My Team → Invite Team Member invitation or a candidate hired through RBT Requisitions. You do not need to create a requisition for a direct invitation.
On Review, turn on Send an offer letter first and select Review offer letter.
Review the letter and compensation, generate the candidate preview, then select Send offer letter.
The candidate signs from their email link, then selects Set up your Alpaca account. Follow their progress in My Team → Hires to finish.
Leave the option off to send a standard account invitation. Signing an offer and registering an account are separate steps. New clinical hires have limited access (Homepage, My Profile, My Payroll) until you select Mark started on My Team → Onboarding.
On the review step you can also turn on Run a background check automatically (clinical roles only).

Review the person's details, then choose an offer letter or a standard invitation.
See the Offer Letter and Onboarding Guide for the candidate's pre-start checklist, the clinic's onboarding view, and how to record the actual start.
What Happens Next

They set a password and confirm their address from the invitation email.
Credentials, tax forms, and direct deposit are collected in their own onboarding checklist.
The start date you chose is their hire date and the start of their first full pay period.
They appear on My Team immediately as an unregistered user (clinical hires appear under My Team → Onboarding until you mark them started), so you can finish their profile before their first day. Use Invite another to send a second invitation without going back to My Team.
After You Invite: Complete Their Profile
The invite captures the basics. Open the new team member's user page to fill in the role-specific details:
Certifications and Licenses. Add each credential with its type, number, issuing authority, dates (including the expiration date), jurisdiction (for example, TX or CA), and status. This is where a BCBA's license and an RBT's certification live, and where Alpaca tracks expirations.
BCBA Information (for BCBAs): work state, languages, hours available, max client capacity, and more.
Availability. Set it accurately, since it drives scheduling and substitute matching.
Emergency Contacts.
Credentialing: Who Needs It
BCBAs need credentialing to bill payers. Have your new BCBA complete the credentialing form so Alpaca can drive their payer contracts.
RBTs usually do not need to be credentialed, but some payers require it. The ones to watch are TriCare West and Baylor Scott and White (in Texas). If an RBT will serve clients on those payers, have them complete the RBT credentialing form as well. Alpaca surfaces the credentialing form link in the invite flow.
Do this early: credentialing is agency-paced and can take weeks, so start it before the person's first day whenever you can.
Leave Time Policies
When you add a team member, you assign them to your leave policies (the "Leave time policies" field in Step 2). That only works if your policies already exist, so set them up first.
Where to set them up. Leave policies are configured in your Organization settings under Leave Time Policies. If that area isn't available to your account, email support@alpacahealth.io and we'll configure them with you. Each policy is a Leave Time Type (the label and category, such as PTO, Paid Sick Leave, Paid Holiday, or Unpaid Leave) plus a Leave Time Configuration (how it accrues and who gets it). See Set Up Leave Time for the step-by-step.
How to think about your policies before you configure them. Decide, for each type of leave:
What you offer: PTO, sick leave, holidays, unpaid leave, and any clinic-specific types.
How it accrues: per hour worked, per pay period, or an annual lump sum.
Who is eligible: all employees or full-time only, plus any waiting period for new hires.
When it resets (for example, January 1) and what happens to unused leave: roll over (with a cap) or reset to zero.
Whether it pays out on termination.
Setting these up before you onboard your team means every new hire can be assigned to the right policy the moment you add them.
Pre-Start Preparation
You can do all of this before the person's official start date:
Send the invite (the five steps above).
Payroll setup starts automatically once they open the invite email.
Have BCBAs complete the credentialing form, and any RBTs serving TriCare West or Baylor Scott and White complete theirs.
For a clinical hire, order their background check from My Team → Onboarding, then select Mark started there on their first day.
That way they're ready to work, and to be paid, on day one.
If Something Goes Wrong
"This email already has an Alpaca account." The address is in use at your practice. Use the suggested extension address, or a different one.
"Multiple accounts match this email." Contact support before inviting this person — this needs sorting out at the account level first.
Continue is greyed out. The reason is written just above the button, naming the field that is missing.
You sent the invite to the wrong address. Suspend the account from My Team using the menu at the end of their row, then invite them again with the right address.
They did not get the email. Use Resend Invite from the same row menu, and check the address on their profile first. For a clinical hire who hasn't started, use Resend invitation on their row in My Team → Onboarding.